If you've been following my blog recently, you know that I am now a very proud member of Tracy's design team over at Craft Junkie Too.
Tracy asked the design team for this week to design a Halloween project with one specific request: it had to be a project that can be hung on a fence, wall, in the trees etc. She called the theme:
Halloween in is in Air!
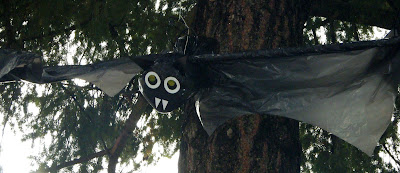
Here is my project: I made a flying bat made out of mostly recycled supplies (which I LOVE)!!
Here are the supplies you'll need:
2 milk jugs
2 black garbage bags
around 5 feet of pvc pole, recycled dowels, metal tent poles, or even a tree branch
7 zip ties
a small amount of Cricut vinyl
a small amount of recycled cardboard
2 large sequins
clear packing tape
a pair of scissors
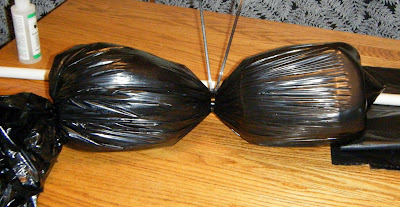
Step 1: Stack the milk jugs like the above picture and put them in the garbage bag.
Step 2: Cinch the garbage bags at the bottom of the milk jugs and in the center using zip ties. Here I used two zip ties in the center (one around the mouth of each jug). Trim off the "tail" of the garbage bags.
Step 3: I used the Cricut Vinyl to make the eyes and fangs. I cut a 2" and 1 1/4" circles for the eyes using the "center point" feature. The fangs are cut from a 3" star. All cuts were using Plantin Schoolbook.
Step 4: Using the second garbage bag, cut wings. I cut the wing shapes freehand while the bag is still whole. I lay out the bag and cut the pieces before separating the seam so that the wings are matching. Then, I cut the bag at the seam.
 |
| Here are the wings after cutting the seam. See how they match? |
Step 5: Attach one wing to one end of the pvc pole (or whatever you choose to use as the wings). I fold the flat side of the wing over the pole and tape with packing tape. Make sure that the tape is attached to the pole too, so that the wing won't slip off the ends.
Step 6: Slip the end through the handle of the milk jug. You may have to cut a slit in the garbage bag
covering the milk jugs to do this step.
Step 7: Attach the second wing to the pole, again using the packing tape.
Step 8: Add a couple of zip ties to secure the pole in the milk jug handle. I like to criss-cross the zip ties (see picture).
Step 9: Cut a couple of ears for your bat. I cut them from cardboard and wrap them in scraps of the garbage bags using glue runner. Fold over the fat ends and tape them to the sides of the jug.
Step 10: Add the sequins to the center of the eyes. Here I have used glittery green sequins.
To hang your new bat:
Attach zip ties to the center of the bat body (at the milk jug handles) and one on each bat wing to hang him/her up in the trees. I usually add some string to hang my bats.
 |
| Here is my bat hanging in the day time. |
 |
| And here he is hanging at night. |
If you are REALLY creative, it would be wonderful to hang your bat using a pully so he can swing down and scare the trick-or-treaters!!! :)
Want to take a look at my other Halloween decorations? Go here to check out my light up ghosts, hand painted tombstones, garbage bag spider and garbage bat spider eggs.
Thanks so much for visiting me here at CardsbyCG.blogspot.com. I'd love to hear what you think. Feel free to become a follower or sign up for my email updates (provided through FeedBurner). I'd love to share my crafting journey with you! - Cheryl


3 comments:
Love you bat.. is awesome and love to see it using household products to boot... :o)you other decor is awesome bet you house is a fav on halloween night...
Thank you for sharing your talent
The Scrapbooking QUeen
Great projects! Super fun and spooky!
WOW! You have some awesome ideas! Love it!
Post a Comment