Showing posts with label Serenade. Show all posts

Tuesday, October 30, 2012

Falling Leaves Shaped Card

Today marks the start of another Die Cuttin' Divas Challenge!!
This weeks theme is:

 I'm not sure what to call it, but for now I'll call this card a Shaker Window Card. : )
As you can see, it's a shaker card. I put two layers of foam tape in between two layers of Recollections Clear Window Sheets. I them sandwiched the plastic shaker between my paper window layers. All paper is from Me & My Big Ideas specialty card stock called "Harvest".

Inside the shaker, I added some leaves from Serenade and some Recollections microbeads to help the leaves move inside the window. I added three brown brads to each side.

Here you can see the card shape. I love this tag shape! :)  I cut a little hill by hand from some more paper from the same paper pack. 

Here you can see the velvety texture of the green hill.

This little sentiment is stamped using Memento Tuxedo Black and a Studio G stamp.

We'd love for you to come on over and play along with us at Die Cuttin' Divas!
This weeks theme is:

Tuesday, October 9, 2012

Favorite Colors of Fall Card

Today marks the start of another Die Cuttin' Divas Challenge!!
This weeks theme is:
-pick your favorite fall colors-

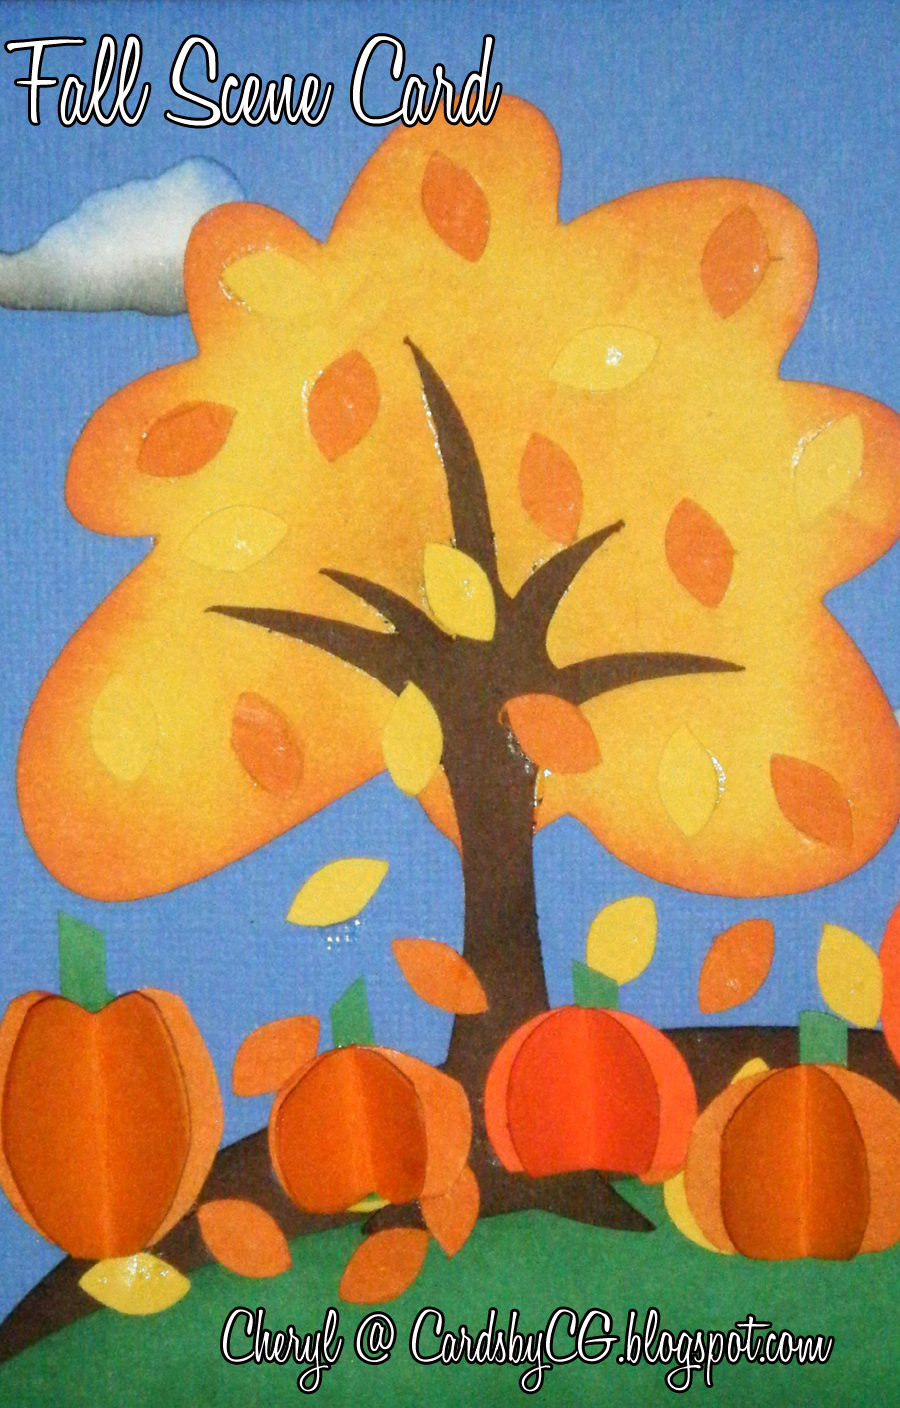
I created this Fall Scene Card today. I've been a little of a creative funk...I really hope this might help me out of it. The card base is 5"x7" to get plenty of room for my scene. All the paper is from scraps! :)

This tree came from Everyday Pop Up Cards, cut at 3 1/2". I cut the base in yellow and using ink and a finger dauber, I tinted the outside orange to create this wonderful fall color! I cut leaves from Serenade in both yellow and orange and glued them randomly around under the tree.
The clouds are from Serenade as well, cut in random sizes from 1/2" to 2". I inked the clouds with blue and then with black on the bottoms. I don't know about everywhere, but here in Washington, it's super rainy in the fall and the clouds are gray... threatening to pour. The sentiment is printed using "Peanuts" font at 18 points.

I created this super fun pumpkins by using circle punches. I just love this simple dimensional element method and I thought it would work on pumpkins too. I punched three of each circle, folded them in half and glued them together to create this form that can stand on it's own but fold down to mail. :)

These rolling hills are from Country Life (cut at 6 3/4" wide). I inked them before building my scene. The blue sky layer was inked too (using blue ink). I love the dimension on this card. 

We'd love for you to come on over and play along with us at Die Cuttin' Divas!
This weeks theme is:
-pick your favorite fall colors-

Thursday, August 30, 2012

Summer "thanks" card

I am a proud member of Cori's Design Team over at Ginger Snaps Scraps and today I have a fun card to share with you!

I love making shaped cards (as you'll know if you are regular visitor) but I like to look beyond the usual shapes for my inspiration. This card, believe it or not, is created by re-sizing a tag shape.
I love summer!! This would be a wonderful birthday card for someone special, but this one is a fun thank you card.

My little sentiment tag is hand cut to about 3/4" x 2". The stamp is from Scrappy Mom's Stamps. I mounted the tag up on pop dots and tucked the end under the tree just a little. I finished off the tag with some white gel pen stitches.

The sun is from Celebrate with Flourish, cut at 1 3/4". I added Glossy Accents to the center (it's still wet in the picture). The clouds are from Serenade, cut at 1" and 1 1/4". Both layers of the sun were inked with orange ink, on the clouds I used blue ink.

This tree is from Simply Charmed, all layers cut at 3 1/4". The grass is from Paper Doll Dress up cut at 1" and 3/4". The little bird is from Serenade, cut at 3/4".  I also used green and clear Glaze pens to add the details on the tree. I inked the tree and grass with green ink and the sky layer was detailed with the same blue ink I used on the clouds.

I hand drew the little daises with my white gel pen and added the centers with a yellow self adhesive rhinestones.

Here you can see the full card base.  I used Tags, Bags, Boxes and More cart.  This tag is from page 91 (button #10) using the mirror creative feature. I sized the base to 4 1/4" x 11". The front layers were sized down by 1/4" each. The black layer measures 4" x 5 1/4" and the blue sky layer measures 3 3/4" x 5".

We'd love if you'd jump over to the Ginger Snap Scraps blog and check out what the other DT ladies have come up with.  Don't forget you can pick up lots of papercrafting supplies at

Sunday, August 19, 2012

Ladybug Scene Card

Hi! Thanks for hoping with us along
 Flowers and Ladybugs Blog Hop (Day2)!! 

If you came from Nicolette's blog (Beyond Scrapin'), you are in the right place.
If you just came across this hop and would like to start from the beginning, please go back to Nicolette's blog (Beyond Scrapin').


Today I have a wonderful little card to share with you. At the end of this post, I'll share the Cricut Cartridges and stamps I used.  


I added lots of dimension under the leaves using some mini-pop-dots. I just love the polka-dot back ground paper I used to represent the sky! :)


See all the dimension.  This isn't the prettiest view of my card, but it really shows how I popped up selected leaves on the tree branches.


I added little pearls to the center of all the flowers and gel pen stitching to the dark blue mat. 


Instead of a ribbon, I embellished this card with a strip of lace! :)


Here's the cute little ladybug!  She's also attached with pop dots.


This is the inside of the card.  See how I added additional flowers and leaves! So cute.

Supplies:
generic white card stock base
dark blue card stock
blue polka dot paper is Heidi Grace
pink patterned paper (flowers) is also Heidi Grace
Liquid Pearls for the flower centers
Lace I picked up at a thrift store
Gelly Roller white gel pen
Scotch Quick Dry Glue
ATG glue runner
pop dots
inside birthday sentiments are Hero Arts : Big Hugs
"Hi!" is TPS Studio

Cricut Cartridges used:
Doodlecharms for Ladybug (cut @ 1.33")
Serenade for tree and leaves (cut @ 7")
Serenade for flowers (cut @ 1/2")
Preserves for card base (cut and welded @ 4 1/4" x 5 1/2")
Preserves for blue bg layer (cut @ 4" x 5 1/4")
Preserves for blue polka-dot layer (cut @ 3 3/4" x 5")


Thanks for visiting me today. 

Before you jump to the next stop, please leave a comment
(and don't forget your contact info) 
to be entered in my drawing for some blog candy...
a $20.00 gift card to either
Michael's or Joanns -- winner's choice!!!
Drawing will take place on Monday, September 4th, 2012.
- I have another blog hop next week and will email all the winners at the same time-
FYI: I don't post winners to my blog, I email the winner(s) directly.


Your next stop in the blog hop is:
Ashley @ The Blog Hop Princess

Here is the whole lineup for this blog hop:

Tuesday, April 17, 2012

Garden Birthday card

Today marks the start of another challenge over at Die Cuttin' Divas.
This week the challenge is:
Garden theme

Today, my card features a 3" wheelbarrow from Walk in my Garden, clouds from Serenade, grass from Everyday Paper Dolls and the sun from Celebrate the Occasion! The card base, sun and sentiment banner are all made from handmade wildflower embedded seed paper!! All those layers can be planted to grow a wonderful garden of wildflowers!

I inked all the layers with a sponge and coordinating ink colors. I hand cut the little banner and stamped it with a Scrappy Mom's Stamp. I used Momento black ink... if you are stamping on textured paper like this, it's a great idea to test the ink on a scrap of the paper before you put it on your project.

The center of the little flowers are finished off with some Liquid Pearls in light yellow.

All the layers and embellishments are added with pop dots. I wanted to make sure they can be easily removed so the card base can be planted.

We'd love for you to stop by Die Cuttin' Divas and enter the color challenge!
Garden theme

The sponsor this week is The Greeting Farm

Wednesday, November 9, 2011

Fall Shaker Window Card

Today is another Craft Junkie Too Design Team day. I can't even begin to tell you how much I love being on Tracy's Design Team!! Her awesome assignments are just a small part of it.  The challenge for this week is:
Thanksgiving

 I'm not sure what to call it, but for now I'll call this card a Shaker Window Card. : )
As you can see, it's a shaker card. I put two layers of foam tape in between two layers of Recollections Clear Window Sheets. I them sandwiched the plastic shaker between my paper window layers. All paper is from Me & My Big Ideas specialty card stock called "Harvest".

Inside the shaker, I added some leaves from Serenade and some Recollections microbeads to help the leaves move inside the window. I added three brown brads to each side.

I filmed a video tour of this card. I just knew it would be hard to appreciate through pictures only.

Here you can see the card shape. I love this tag shape! :)  I cut a little hill by hand from some more paper from the same paper pack. 

Here you can see the velvety texture of the green hill.

This little sentiment is stamped using Memento Tuxedo Black and a Studio G stamp.

That's it, please head over to Tracy's blog and see what

Sunday, October 16, 2011

Fall Scene Card

I created this Fall Scene Card today. I've been a little of a creative funk... I needed to make a card for a DT post but made this one too. The card base is 5"x7" to get plenty of room for my scene. All the paper is from scraps! :)

This tree came from Everyday Pop Up Cards, cut at 3 1/2". I cut the base in yellow and using ink and a finger dauber, I tinted the outside orange to create this wonderful fall color! I cut leaves from Serenade in both yellow and orange and glued them randomly around under the tree.
The clouds are from Serenade as well, cut in random sizes from 1/2" to 2". I inked the clouds with blue and then with black on the bottoms. I don't know about everywhere, but here in Washington, it's super rainy in the fall and the clouds are gray... threatening to pour. The sentiment is printed using "Peanuts" font at 18 points.

I created this super fun pumpkins by using circle punches. Jess over at Kinder Stampo created some ornaments using this piecing method and I thought it would work on pumpkins too. I punched three of each circle, folded them in half and glued them together to create this form that can stand on it's own but fold down to mail. :)

These rolling hills are from Country Life (cut at 6 3/4" wide). I inked them before building my scene. The blue sky layer was inked too (using blue ink). I love the dimension on this card. 

Challenges:

Sunday, August 21, 2011

CAS sympathy card

When I go "clean and simple" I don't mess around! :)
I made a super simple card today. The branch and flowers are from Serenade cart, cut at 2 1/4".  I just used the top layer of the flower petals and cupped them a little with my stylus.

The stamp is from Scrappy Mom's Stamps. The card is a white A2 card base, with a black mat and then an embossed white layer measuring 4" x 5 1/4".

I dotted the centers of the little flowers with some liquid pearls. For the embossing, I used a "Studio by Sculpey texture maker" called Spring Morning. It's designed to be used with clay, but I ran it through my embosser with some fun foam mats.

The inside sentiment is also by Scrappy Mom's Stamps.

Challenge : 
There is also a Queen of my Craftroom DT challenge to make a card using only black and white with just a small touch of pink.

Tuesday, August 16, 2011

Tire Swing Tent Card

 My good friend Georgiana is a very proud member of the Die Cuttin' Divas design team and she asked me to be a guest designer for today's "kid challenge."
This tent fold card measures 4 1/4" x 5 1/2". The adorable card front cut out measures 4" (from Preserves).  The card front layer is a wood grain paper from DCWV's Green Stack.

The terrific branch is from Serenade and I sized it (and the leaves) to 4 1/4" wide so it will extend beyond the card mat. The leaves are inked with green ink and attached to pop dots. I strung the tire swing to the branch with some craft string... it needed something else, so I also tied some in a bow and hot glued it to the top.

I added gel pen doodling all over this card... no rhyme or reason, I just added them where I thought they'd look good.  The button is adorable, I tied some more of the craft string to the center to match the rope for the tire swing.

The tire is made up of a series of circle from Plantin Schoolbook.  The black tire measures 2 1/2" and 2 1/8" and the white wall line measures 2" and 1 5/8". The adorable little boy (from Everyday Paper Dolls) is 3 1/2".

I finished off the back of the little boy too, I cut two of all his clothes so that if the tire swing got turned around, it would still look good. I cut the little boy in half (he didn't feel a thing) so I could attach him as though he is sitting on the tire. I used some scrap cloud paper to finish up the inside of the card.

Here you can see how the card stands on it's own.  The way the card is folded, it will flatten out to fit into a standard A2 envelope.  I'm not sure where you'd write on this card, but it was too cute not to make it!! Once I had the idea of this card, I just HAD to make it! :)

Please head over to Die Cuttin' Diva's and enter the "kid challenge."

Challenge:
(everything except the card base is from my scrap bin)
Craft Junkie Too Friend

Wednesday, July 6, 2011

Vellum Window Card Tutorial

Today is another Crafty Designer Day over at Craft Junkie Too!! This week Tracy challenged us all to share a project of our choosing... how fun is that.  So I am sharing a tutorial.  :) A little while back, I shared this wonderful vellum window card, I had several visitors ask for a tutorial. Feel free to download the PDF of this tutorial (via 4 Shared.com) or you can even download the Gypsy file too.

Here is the card I will share today:

Here are the pieces you'll need:
1: two frames from Cindy Loo - welded together and a bird card from Serenade welded into the card front
2: Same two frames from Cindy Lou - sized a little smaller (for a second card layer insert)
3: One of the frames (center hidden) cut in vellum
4: One birdcage - with bird - from April Showers (sized to 3.5")
5: One birdcage - without bird - from April Showers (sized to 3.5")
6: a second frame - same as the card front - but without the welded card back.

Card body frames are sized to : 5.5" x 4.75"
Card insert frames are sized to 5.25" x 4.5"

Step 1: piece together the bird and her cage layer. I used dark blue shimmer paper for the bird layer and white glitter paper for the cage.

Step 2: glue the bird cage layer onto the card front frame.  For the frame, I used this wonderful brown paper with tiny blue polka-dots (from DCWV Butterfly and Blooms stack)

Step 3: glue the vellum layer to the top of the card base layer. I used scotch quick dry glue... it shows through but it won't matter because we'll cover it in the next step.

Step 4: Attach the frame (with bird cage later) to the card base.  You will be sandwiching the vellum layer between the card base and your frame layer.

Step 5: fold your card base insert and attach to the inside of your card.  You can skip this step, but anything you write in your card will show through the vellum layer.  On the other vellum window card I made, I didn't have the heart to write in it! :)

This is what the insert looks like opened up. See, lots of room to write now! :)

Here is the completed card.  See how the blue card insert shows through the vellum?

To finish off the card front, I added some white gel pen stitches, flat back adhesive pearls and a  light blue sheer bow.

I stamped this sentiment on the top of the insert. This stamp is from My Pink Stamper's Punny-licious set.  I lined this stamp up to hide under the bird when the card is closed.  I added some more white gel pen stitches on this layer.

And here is the final layer of the card. I stamped a Scrappy Mom's stamp here.  More gel pen stitches and I am done! :)

I just LOVE how this card turned out.  Here I held the card front up in front of my crafting light.  I love how the light shows through and illuminates the birdcage.

Once again, here is a link to the PDF of this tutorial, you can easily print the tutorial to take to your craft space.  It includes all the steps and pictures too.


post signature