Showing posts with label cricutless. Show all posts

Monday, June 24, 2013

Lego Mini-fig Storage


Hi everybody,

Today I have a super fun project to share that was entirely inspired by my son, Bryce. He loves his Legos and been collecting Lego Mini-Figurines (Minifigs) for about a year now. He loves those little mystery ones in the foil pack but has some more rare ones too. Anyway, he wanted a way to store his minifigs so that he can see them, but still take them down and play with the occasionally. :)


This project was inspired by an Etsy item I found, I'll include that link at the bottom of this post in case the project is a little too involved for you (or the Lego Lover in your life).  Okay, on to the project. 

You'll need the following supplies:
- a shadow box, either store bought, or thrift-store find like we did ($2 each @ Value Village)
- Spray paint for your frame - if it was a thrift store find or you'd like to change the color
- the backer for your frame (or wood, cut to fit, if needed)
- Spray paint for the backer board
- 2x2 Legos in the color of your choice (we used 42 of these found on Ebay)
- Saw-tooth picture frame hangers

Since we found our 16" x 20" frames for $2 at Value Village, we needed spray paint to make them match the room they are going to be living in. In my son's case, we are painting his room right now, and he is WAY into orange, so we went with an orange backer, orange Legos and a black frame. Three coats of black paint and the frames were good to go. :)

We cut our 1/4" birch plywood to fit the inside of our frames and sprayed them with Island Orange by Valspar. Here, Bryce is modeling how well it matches his orange shirt. :)

Next, we used painters tape to attach the template we made for the Lego placement. I used an Exacto Knife to cut all the rectangles out so I can glue the Legos into place with the template attached. It worked out perfectly. Yeah! :)

If you'd like to download my template, it will be added to the bottom of this post.

Here you can see how I placed the Legos on their side into the template holes.

See, they went in perfectly. So easy.

Here is the backer board, all the Legos in place... gotta love that shiny finish too.

And this is the backer board mounted inside the newly painted black frame....

.... and loaded up with Bryce's favorite Lego minifigs. I have most of the supplies to assemble a second frame for Bryce's collection. I just have to get ahold of some more orange 2x2 Legos.

I just love how the Legos blend in to create the effect of the minifigs floating in the frame. Just perfect. 

Here is the Etsy store that inspired us to create our own minifig storage frame. 
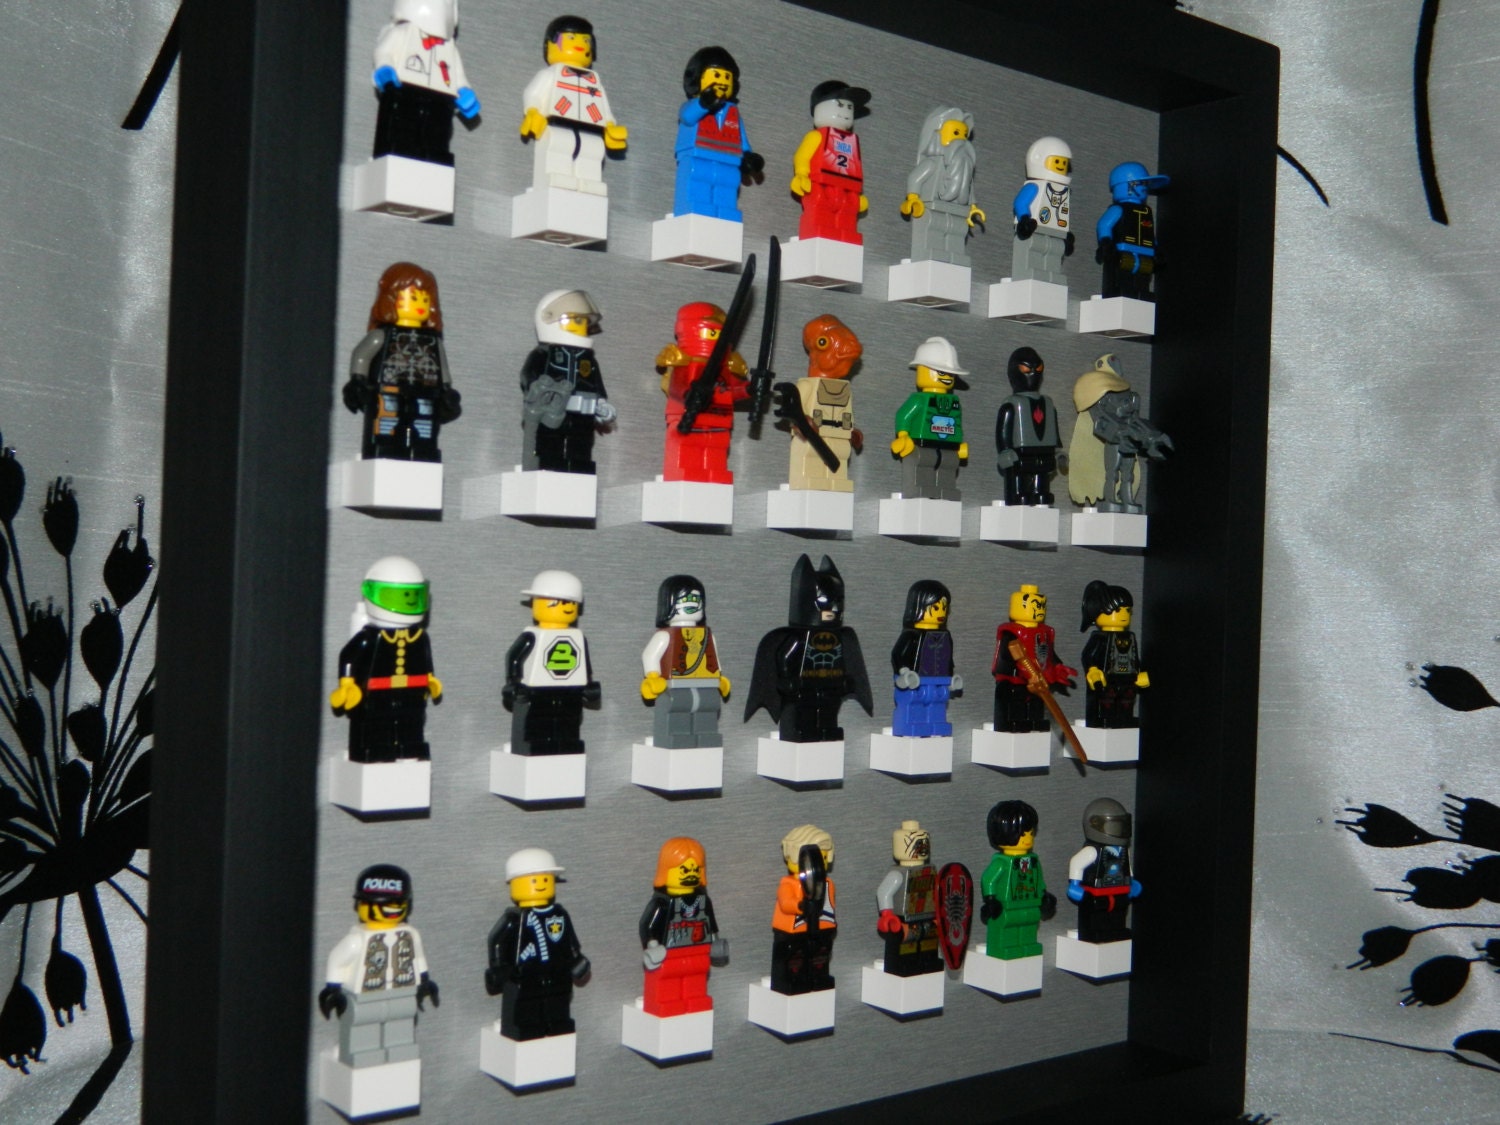
This one is wonderful and all, but for $25.99 plus $12.00 shipping (for a total of $37.99), I knew I could do better. Our frame cost us only $13.50 to built... and ours store 42 minifigs while the Etsy one stores 28.

And last but not least, here is my template for the Lego placement on a 16"x20" backer board. It can easily be altered for a smaller frame too. 
To save the template, click on it to open it in full size, then just right click to save it. 

Just print the file onto multiple sheets and then assemble to become a full size template. The directions will print directly on the template.

Enjoy! Please feel free to link to this page to share your creations too. I'd love to see them. :)

Saturday, June 22, 2013

Jar Shaker Card and a Blogaversay Hop

Welcome to the 3 Year Celebration for
Georgiana at Carson's Creations. 
 If you've come from Lee-Ann's blog at Lee Scraps  you are in the right place! If you just came across the hop, please start at the beginning over at Carson's Creations.


 Okay, time for my project:
I created this Jar Shaker Card using Lawn Fawn's Summertime Charm stamp set and matching die cut set. I was totally inspired by Chari Moss of the Lawn Fawn Design Team to make this card and followed her basic directions but tweeked it to work for Georgiana's challenge of threes for her blogaversary.
See Chari's YouTube tutorial here.

My card measures 4 1/4"x 5 1/2" (standard A2) portrait style card. All the paper is from Creative Imaginations 6x6 "Brights" paper collection.
Simply Brights 6x6 in Scrapbooking Paper Pad 36 Sheets Creative Imaginations NEW
I used the blue swirl, the orange swirl and the green swirl (3 patterned papers). I inked all the edges with black memento ink.


The black cardstock layer measures 4" x 5 1/4", the blue swirl paper measures 3 3/4" x 5". Then I cut 1/2" pieces from the green and orange swirl paper and cut the banners at the ends. I then stamped the sentiments using a couple "Scrappy Mom's" stamps. I glued it across the card and then die-cut the jar shape out of the assembled card front.

I set the assembled and die-cut card front on top of the white card base and used the Summertime Charm stamps to stamp the jar directly on the base. Then, I stamped 3 lightening bugs and their matching "shine" stamp and colored in the bugs (adding stickles to the rear ends). I then cut a layer of craft foam to match the front, and then used the matching jar die-cut to create the layer of foam necessary to make this card into a shaker card. I stamped, colored and die-cut extra lightening bugs to "fly" around the inside of the shaker card with the micro beads I used. 

Before assembling the shaker card, I added the three black button brads to the card front. Then using score tape, I assembled the card in this order:
card base -- die-cut craft foam --add the micro beads and bugs -- attach a piece of transparency (or recycled clear plastic packaging) to the back of the card front -- attach the card front to the card base.

Lastly, I added three escaped lightening bugs to the top of the card. LOVE them! :)

Did you keep count?? Here are the "three"s in my project:
3 patterned papers, 3 sentiment banners, 3 sentiment stamps, 3 lightening bugs stamped in the jar, 3 lightening bugs loose in the jar, 3 buttons and 3 escaped lightening bugs. :)

Since this is 3 Years of blogging and crafting fun, we have LOTS of FABULOUS sponsors...

 stamp set
$15 gift certificate


dew drops

To qualify to win, you must:
1. Be a follower of Carson's Creations
2. Leave a comment on every stop of the hop
 
Winners will be announced at Carson's Creations on Thursday, June 27th.
 
Your next stop will be Pat at Pat Scraps
 
Here is the line-up: 
Thanks for joining us today for
Georgiana's 3 year  Blogaversary celebration!

Saturday, October 20, 2012

Halloween Monster Hoodies

Thanks for joining us for our

If you just stumbled in on our wonderful blog hop, please jump over to Nicolette's blog at Beyond Scrapin' so you don't miss a thing.


 Here is what my boys and I came up with. My boys and I made
MONSTER HOODIES!

Here is what you'll need for this project:
A Hoodie - recycled is best, but I bought ours at Walmart for $10 each
Felt - we used black, white, red and green - .25 cents a sheet at Walmart
Fabric Glue - we used "Aleene's super fabric glue"
Scissors
sewing machine is optional if you want to have a super secure hold
(if you want to make matching gloves, grab some of those too)

 Here is the video we used as inspiration:

As much as we loved "Thread Bangers" version of a monster hoodie, we changed up the eyes, added a tongue and Owie (my 6 year old) said he just needed spikes down his back.


We also sewed our parts down after my boys glued them where they wanted them. I know this step may not be needed, I know my kids... this hoodie will be worn and loved and need to be washed. :) I knew it would be much more likely to come out of the washer in one piece if the parts were sewn down.


We tried to match the thread colors up with the felt pieces, except for the teeth row, for this layer we matched thread with the hoodie color.

To help the spikes stand on their own, we sewed them together down the points.

Here is the finished hoodie for my oldest son, Bryce. He is nine. The tongue on his monster is snake-like and he wanted a more "furious" monster so he picked red for his eyes.

I love the little shine we added to the monster's eyes. :)

See how the spikes stand up? Both of the boys settled on three body spikes and two head spikes.

Here is Owie's (my 6 year old) monster. He chose green eyes - to match his own eye color. I love that he chose red for his spikes, they really show up against the gray hoodie.

You can see how his eye shape is different than Bryce's. His tongue is wider too but they both wanted them forked.

Here you can see the stitching lines. A very special "thank you" to my sister who helped out with the sewing! I now have a special order to make a monster hoodie for my nephew! :)

 
I love that my boys love these hoodies enough to NOT save them for Halloween. :)

And here are my little monsters... making their brand new monster personas wrestle! :)

We also made matching monster gloves... what's a monster without claws? We cut more spikes and added some claws - attached everything with fabric glue. Let it dry and you are good to go.

Here is Bryce's monster hands (hiding behind my handmade gravestones in the front yard).

Here are Owen's gloves... be sure to match your spike color to your Monster Hoodie. Owen suggested we add the claws using those el-cheep-o acrylic nails but I didn't want sharp nails if they are planning to wear these to school.

And here are his gloves... the gravestone says "Here lies the invisible man... I think!"

Thanks for stopping by, please don't forget to comment for your chance to win a prize goody bag. Leave an email address 'cause I'll drop you an email if you win!! :)

Your next stop is:

Thursday, September 27, 2012

Pinwheel Card

Hi! Thanks for hoping with us along


If you came from Sharon's Blog @ Simply Sweet by Sharon, you are in the right place.

If you just came across this hop and would like to start from the beginning, please go back to Jenny's blog (Crazy About Cricut).


Today I have this fun card to share with you. The card base measures 6" x 8". I created the pinwheels first, selecting paper from Echo Park's Dots & Stripes paper pack. The pinwheel papers measure 2" x 2". I then added these adorable sticks (they're actually coffee stir sticks) and hot glued them together. 

Each pinwheel has a simple button at the center although it would be wonderful with a brad in the center so the pinwheel could still spin. The background paper is some Coordinations paper that is pre-embossed with a small polka dot. 
If you are unsure about making these cute little pinwheels, I assure you, they are EASY!! These (along with about 10 others) were made by my two boys!! :)

This cute sentiment is from Hero Art's "Thank you for being my friend" stamp set. I hand cut a little banner for the sentiment and them paired it with a 1/8" border of black to match the body of the card.

This terrific twine is from The Twinery. I just love the red and white. I added a little bow I tied with my Bow Easy and hot glued it to the pinwheel sticks. I wanted a little more twine on the card so I added these little white corners (simply 1 1/2" squares cut in half on the diagonal) and attached a little strip of twine there too.

The inside of the card received a sentiment from the same Hero Art's "Thank you for being my friend" stamp set. I also added similar layers to the card front.

Thanks for visiting me today. 
Before you jump to the next stop, please leave a comment
(and don't forget your contact info) 
to be entered in my drawing for some blog candy...
a $20.00 gift card to either
Michael's or Joanns -- winner's choice!!!
Drawing will take place on Monday, October 1st, 2012.
FYI: I don't post winners to my blog, I email the winner(s) directly.


Your next stop in the blog hop is:

                      Amber @ My 3 E Scrapbooking

Tuesday, August 28, 2012

Elegant Birthday Card

Today marks the start of another Die Cuttin' Divas Challenge!!
This weeks recipe is:
Twine, 3 buttons and pop dots!!


Here is my take on the recipe. I just love the simple color scheme. :) This is a standard A2 card, the patterned paper is from a Recollections paper pack called "Elegance," the whole pack is lovely and in this wonderful cream and black color palette.

This cute little banner is adorned with a black and white twine bow. The sentiment stamp is from Hero Art's "Sending Smiles" stamp set. This little banner is popped up on foam adhesive.

These cute little buttons are actually die cuts!! They are from a set called "round buttons" from Memory Box. It is a metal die set and includes four sizes from 1/2" to 1". I attached the paper buttons with pop dots too.

Here you can see some of the wonderful dimension that foam adhesive adds, you also get a peek of the inside of the card too. And my cards wouldn't be finished without some white gel pen stitches. :)

The inside is finished off with some more of the same paper, I even cut another banner for the inside. This sentiment is also from Hero Art's "Sending Smiles" stamp set. 

We'd love for you to come on over and play along with us at Die Cuttin' Divas!
This weeks recipe is:
Twine, 3 buttons and pop dots!!

The sponsor for the Challenge prize is: