Showing posts with label Cricut Cardz. Show all posts

Friday, August 12, 2011

CAS hearts thank you card


I love this super simpe card I made today.  It really only has a few elements, but the clean and simple concept sure is hard for me!  This card measure 4 1/4" x 5 1/2", the black mat it 3 3/4" x 5" and the white mat is an 1/8" smaller all around.  That's all the layers...


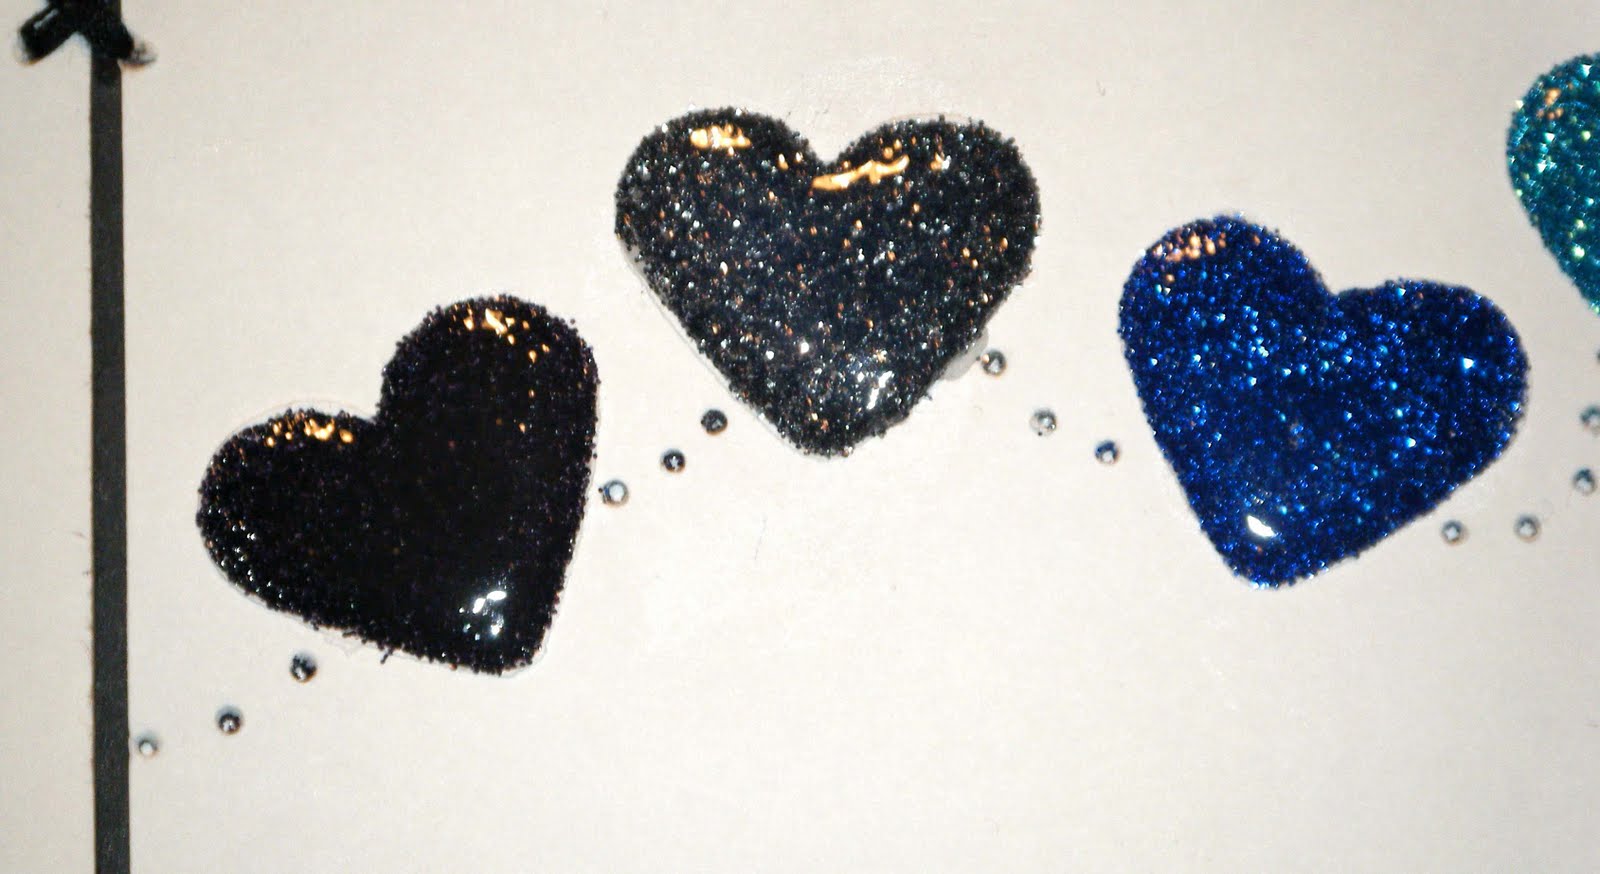
These little hearts were cut from Fabulous Finds (retired cart) at 3/4" in white.  Then I attached them to the white layer with quick dry glue, stamped the sentiment and went to work.  I used a paper piercer to poke the little heart trails and a few holes in between the two stamped sentiments. I also poked the holes for the little "x"s that I used to attach the black and white mat to the white card base.


Then I applied Glossy Accents to one heart at a time, then sprinkled fine glitter over each heart.  I used the little packs of four colors that Michaels carried last Christmas. After the GA dried, I added a second layer to seal the glitter into the heart... making for a wonderful dimensional element. 


I used just a little ATG glue to secure the black and white mat to the card base and hand stitched the "x"s.  Some of them are a little rough looking, not perfect etc... but it's homemade... it won't be perfect every time.


I love this sentiement.  It has this wonderful curve I tried to mimic with the hearts.  I have no idea who made the stamp, I found it with out packaging in Joann's as-is department... a 15 piece stamp set for 75 cents.


I kept the inside very simple too... just adding a second stamp from the set. 

Monday, August 8, 2011

Blueberry Birthday Card

I've been finding myself making lots of shaped cards lately.... and my go-to shape recently has been a tag. Today is no exception.

This wonderful card was inspired by my 6-year old.  He has a Great-Uncle that has these wonderful HUGE old growth blueberry bushes in his back yard.  When my boys were little, their Uncle would happily take them to go pick blueberries in his yard..... When I asked my son what kind of card we should make for Uncle Robbies's birthday, he said "we have to make him a blueberry card!"

All cuts are from Preserves.  The tag card base is sized to 4 1/4" x 5 1/2, and then welded on my Gypsy.   The navy blue card mat measures 4" x 5 1/4" and the green patterned paper measures 3 3/4" x 5".

The blueberries are cut at 3 1/2" and I inked all the layers before assembling them (green ink on the leaves and blue ink for the blueberry layers). I attached the cluster of berries with pop dots and three leaves are up on pop dots too. Gel pen doodle-dots are one of my favorite touches. :)

A scrap of the card base punched with an old tag punch became the perfect sentiment tag.  This "happy birthday" stamp is from Studio and it's been embossed using white powder. More doodles, a few pop dots,  a navy colored brad, and some blue 1/8" satin ribbon finish off the bottom of the card.

I tried to keep the embellishments to a minimum to keep it more of a manly card... I don't know how masculine it turned out, but I love it anyway.

The inside got some scraps of the outside paper and matching inking and gel pen details. All paper came from my scrap bin except for the green patterned paper. It's from DCWV's Cafe Mediterranean mat stack. I know that the blue textured paper that I used for the card base is Bazzill card stock.

Challenges:

Monday, August 1, 2011

Orange Dreamsicle Card - take 2

I made an orange dreamsicle card a while back... here is an updated take on that card.  For this one, I used Doodlecharms and cut the top at 3" W x 4" tall.  That left me with 1 1/2" for the sticks and it still fits into an A
2 envelope.
I cut the dreamsicle top with orange ink, the card base is white.  I inked all the orange with a darker orange ink to give the layer dimension.  For the sticks, I used the large craft sticks (think tongue depressor size) cut in half. I glued the sticks in using hot glue and then used foam tape to attach the front to the card base.

The little tag cut is from an old punch I have, the stamp is from Studio G's Sweets collection. The adorable sheer ribbon is actually from Dollar Tree, if you haven't looked there for craft supplies, it is worth the trip.

On the inside of the card, I printed out the sentiment. The punch is a journaling tag punch from EK Success. I just took the same orange from the front and printed on it before punching, inking and gluing them to the inside of the card.

Here is the close-up of the sentiment tag. :)

I ended up making a few of these cards... ten for a swap and a few to give to friends for National Friendship Day (July 30th)

Challenges: 

post signature

Sunday, July 24, 2011

Monogrammed Flower Window Card

I have a fun card to share with you.  The funnest part is the vellum window. :)

The flower cut is from Joy's of the Season. I welded the shadow to a Cindy Loo frame to create the front of the card.  I welded two frames (hide all contours) to create the card body. It sure creates a terrifically different card! :)

The Cindy Loo frame is sized to 4 1/4" x 5 1/2".  All card stock is Bazzil: I cut the card base from white, the front card layer in purple, the stems in green, and the flowers and butterflies (MS Butterfly punch) from pink. I cut an addtional card front layer from vellum and sandwiched it between the purple and white card base  layer.


This flower is cut from Joys of the Season, sized to 3 1/2".  I cut three layers for the flower head so I could curl them to add a ton of dimension.


I added the "V" from Cindy Loo. I welded it into the card base too. Doesn't it make an adorable monogram on this lovely card.  I love the simple details on Cindy Loo.

I added some white flat back pearls to the flower center and a few around the card. 


Here you can see the wonderful card shape!! I hope you enjoy this card as much as I do. :)

Challenges: 
post signature

Friday, July 15, 2011

Raspberry Birthday

Here is an adorable card I made today.  I used Preserves for the raspberries cut at 3 1/2" (the leaves are from the blackberries on the same cart). The tag shaped card base is also from Preserves.  I sized it to 4 1/4" x 5 1/2" and welded two for the card base.

I inked around the raspberries with some red ink. The polka-dot paper is from DCWV's Stack 7.  I inked the stems and leaves using green ink.  Some Glossy Accents really add lots of shine to the berries. :) The green polka-dot base also got a touch of green ink.

I used a 1/8" Gros Grain ribbon in red for the bow.  I used my Bow Easy to tie this four looped bow and added a little black button to the center. The leaves are attached with pop dots and the dimension is fantastic in person. 

I printed the sentiment using "Marker" font at 30 points.  

Here is one last look at the card.  I love it... I hope my hubby's Grandma likes it too... she'll get it next month at her 88th Birthday party!

post signature

Thursday, July 7, 2011

"Super Cool" Sun Card

Here is a super cool card! :)  The shaped card base is the sun is from Create a Critter. I sized the shadow layer to 5 1/4" and then welded together to form the base. All sun layers were inked with orange ink before assembling.  The sunglasses were from the sun cut on Simply Charmed (sized to 6").

The sentiment tag has the "Have a super cool day!" sentiment that came from three different My Pink Stamper stamps from the Punny-licious set. I also inked the tag with orange and then added a black button with white twine bow to the top.

I accented the sun with white gel pen and intended to add a Peachy Keen face stamp for the sun.... but the largest face in my Everyday Faces Assortment was too small!!!!  So I had to dry a face on by hand. I used my black Glaze pen (it has a shiny look when dry). I also added some cute little pink chalk to the cheeks.

After I added the white gel pen accents on the sunglasses, I added a couple layers of Glossy Accents to give the glasses wonderful shine and dimension.

Here you can see how I welded the card base to from the shaped card.  I adore shape cards and make them often... if you haven't made one, give 'em a try!! They are so fun (and addicting). :)

Challenges: 
post signature

Thursday, June 16, 2011

Father's Day BBQ Card

Hi Everybody! Today is Thankful Thursday over at CrazyAboutCricut, and I am a very proud member of the Design Team. The challenge this week was to make something for Father's Day.  Here are the cards by  six and eight years old sons made with me today:
We made these pocket BBQ cards. I'll be including a full tutorial, so please forgive me for the tons of pictures on this post. So, here we go...

You'll need the following cuts from From my Kitchen:
BBQ and it's shadow - 4" - red / black
Spatula - 2" - metallic silver
Handle from the hand mixer - 1" - metallic silver
oval sized to 1" x 4" (for under the grill top) in silver

Cuts from Robotz:
half circle (red lid for BBQ) - 4" W x 2" H - red
half circle (black for lid shadow) - 4 1/4" W x 2 1/4" H - black

Extras:
Background paper cut to 4" x 5 1/4"
card base 4 1/4" x 5 1/2"
4 1/4" x 3" piece of cardstock for the insert.

First, attach the silver oval under the grill top. We used Scotch Quick Dry Glue.

Glue all the shadows to their pieces.  My kids do pretty good lining up the pieces, but younger kids might need some more help. The glue the BBQ to the card base after attaching the background paper.

THIS IS A PARENT ONLY STEP:
Open up the card base and put it on a self healing mat. Use an Exacto or similar knife to cut open the BBQ at the base of the grill top (see photo for help). Cut all the way through the card front.  

Glue the card base together to make a pocket.  I marked the inside of my card to show you where we put the tape runner (we use my ATG gun). Glue the four sides of the card front along with a couple more strips of glue along the top of the card above the cut only (see picture).

My eight year old added all the "Happy Father's Day" stamps. This one is from Studio G. My six year old added the silver metallic spatula with some more quick dry glue.

Slip your insert into the pocket as far as it can go.  Add some pop-dots along the top of the insert. 

Place the lid onto the pop dots. Try to line up the lines of the BBQ and completely cover the grill top. My kids both love this step! :)

See how the BBQ lid pulls the insert?? Love it! :)  

We added just a little scrap slip of the bg paper to the bottom of the insert. It looks cute and there is no waste. We made six of these cards and needed one sheet of the 12x12 DCWV paper (called Juniper stars on Cream), two sheets of red card stock, two sheets of black and only scraps of the silver and metallic silver paper. For our card bases we used pre-made white cards, but it would only take three sheets of white card stock if you are making your own card bases.

Now that we have all our Father's Day cards done, it's time to get them in the mail! These would also make AWESOME invitations for a BBQ or party too... in fact that's what I'll be working on next! 

Don't forget to head over to Crazy About Cricut, and enter your family project and to see the awesome inspiration projects from the other DT members!

Challenges:


Craft Junkie Too Friend 
Paper Cutz Challenge : Father's Day - use a tag


post signature

Sunday, June 5, 2011

Present within a Present

I have this super fun card to share today.  It is made using the card feature on Sweet Treats using Present # 1. I sized it on my Gypsy to be a completed card base measuring 9" x 4".  This size fits perfectly in a business size envelope.  What's great about that?? These envelopes are super cheep and easy to find... plus they don't require ANY extra postage!! 

As usual I added some gel pen stitching and doodling with my Gelly Roll pen. I inked all the edges with a dark pink ink before assembling the card.

Except for the black and cream card stock, the paper is from a Paperage stack called Cupcakes and Cherries.  Can you see the little cupcakes all over the yellow pattern paper?? SO cute right?

The sentiment stamp is by Inkadinkado from the $1 section. I punched it out with an EK Success punch called Photo Labels and then hand cut a pink and black layer to go around it.

Because I used the card feature on Sweet Treats, it was smaller than the shadow of the gift.  Here you can see how the shadow peeks out from behind the card base. Usually I make the card base by welding a couple of the shadow layers with my Gypsy, that way I don't have this issue.

Here is a close up of the gift card pocket. I took the front gift layer and sized it down to 3" x 2 1/2" to fit a gift card.  Just adhere the bottom and sides to the card and you have an easy little pocket that holds your gift card perfectly. The "Enjoy!" stamp is by Scrappy Mom's Stamps.

I picked up these super cool white shimmer envelopes that are #10 size and fit these cards perfectly.  I've been having a problem finding business sized envelope without the security printing inside.  I hate sending off a birthday card that looks like a bill, so these pretty envelopes are exactly what I needed.

Challenges:
post signature