Showing posts with label Everyday Pop up Cards. Show all posts

Tuesday, October 9, 2012

Favorite Colors of Fall Card

Today marks the start of another Die Cuttin' Divas Challenge!!
This weeks theme is:
-pick your favorite fall colors-

I created this Fall Scene Card today. I've been a little of a creative funk...I really hope this might help me out of it. The card base is 5"x7" to get plenty of room for my scene. All the paper is from scraps! :)
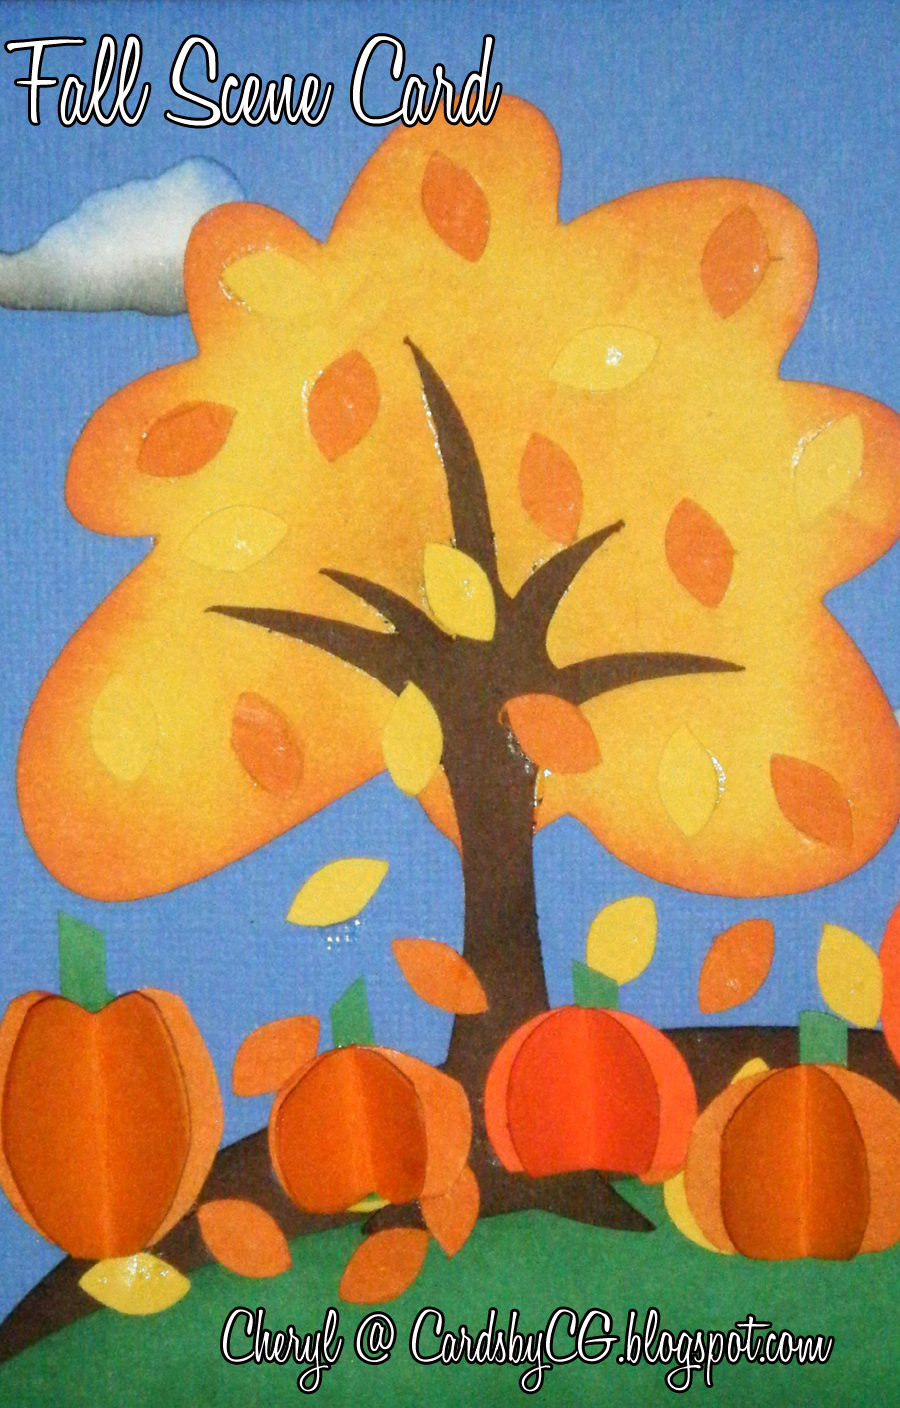
This tree came from Everyday Pop Up Cards, cut at 3 1/2". I cut the base in yellow and using ink and a finger dauber, I tinted the outside orange to create this wonderful fall color! I cut leaves from Serenade in both yellow and orange and glued them randomly around under the tree.
The clouds are from Serenade as well, cut in random sizes from 1/2" to 2". I inked the clouds with blue and then with black on the bottoms. I don't know about everywhere, but here in Washington, it's super rainy in the fall and the clouds are gray... threatening to pour. The sentiment is printed using "Peanuts" font at 18 points.

I created this super fun pumpkins by using circle punches. I just love this simple dimensional element method and I thought it would work on pumpkins too. I punched three of each circle, folded them in half and glued them together to create this form that can stand on it's own but fold down to mail. :)

These rolling hills are from Country Life (cut at 6 3/4" wide). I inked them before building my scene. The blue sky layer was inked too (using blue ink). I love the dimension on this card. 

We'd love for you to come on over and play along with us at Die Cuttin' Divas!
This weeks theme is:
-pick your favorite fall colors-

Tuesday, August 14, 2012

Airplane Birthday

Today marks the start of another Die Cuttin' Divas Challenge!!
This weeks theme is
National Aviation Day!!
(create a project with a plane, helicopter or glider)


I created this card using Everyday Pop up Cards. The plane measures 2 1/2", the card base is 4 1/4" x 4 1/4" so it will fit in a standard envelope. A sweet little red bow and sentiment banner finishes off the card front.

 I embossed the blue layer (4" x 4") with a Darice embossing folders called "Cloudy Sky" and then inked it using a white ink pad.

I used a Hero Arts stamp from the Big Hugs set and hand cut the little "v" for the banner and made a matching mat with some black cardstock. Both the banner and the card base were embellished with my white gel pen "stitches".

I attached the plane body to the wing parts with a layer of pop dots and then attached both the plane and the banner to the card base with pop dots too. I just love all the dimension.

I finished off the inside of the card with another stamp from the Hero Art's Big Hugs stamp set. 

We'd love for you to come on over and play along with us at Die Cuttin' Divas!
This weeks theme is
National Aviation Day!!
(create a project with a plane, helicopter or glider)

The sponsor for the Challenge prize is

Tuesday, July 10, 2012

Monarch Butterfly Birthday

Today marks the start of another Die Cuttin' Divas Challenge!!
This weeks theme is


Here is my Monarch Butterfly birthday card. I love the colors, that patterned paper, and I really couldn't go wrong with this wonderful butterfly. :) This is a standard A2 (5 1/2" x 4 1/4"). The patterned paper is from Echo Park's Summer Days collection. Then I just pulled colors from the pattern to add my rhinestones and die cut layers.

As you can see, I turned the sketch on it's side for my card. :)

The beautiful butterfly is from Everyday Pop Up Cards. This is my absolute favorite butterfly on any Cricut cartridge. I cut the bottom layer out in orange, the top layer is black and I doodled spots on it to resemble a Monarch. The body is attached to the card and the wings are up on pop-dots. The butterfly and all it's layers are cut at 2".

The branch and leaves are from Cindy Loo. I doubled up the branch and welded it with my Gypsy. It's cut at 2 1/2" including the leaves layers. To give the leaves the wonderful texture/realism, I inked the edges using some darker green ink and a sponge. Some of the leaves are attached with pop-dots.

I couldn't resist adding some white gel pen stitches and this adorable birthday stamp from Inkadinkado.

These little stripes were cut to 4" x 3/4" and then punched with my Fiskars scalloped border punch. The three embellishments running along the box in the sketch became so charming when I added some dark pink self-adhesive rhinestones to finish off the sketch.

We'd love for you to come on over and play along with us at Die Cuttin' Divas!
This weeks theme is

The sponsor for the Challenge prize is

Wednesday, April 25, 2012

Bee Happy

Today is another Craft Junkie Too Design Team day. I can't even begin to tell you how much I love being on Tracy's Design Team!! Her awesome assignments are just a small part of it. 

 The challenge for this week is:
Designer's Choice

I LOVE shaped cards and this is one of my favorites. I grabbed a tag shape from Preserves and sized it to an A2 card base (5 1/2" x 4 1/4"). Adding some layers is a wonderful technique. I inked the yellow honey-comb-like layer with some brown ink.

This adorable and simple bee is from Everyday Pop Up cards, cut to 3" the size fits perfectly into the shape at the top of the card.

This wonderful sentiment is from a Studio G set I grabbed at Joann's for $1. The black and white ribbon is from my stash. I just love how the polka-dot ribbon mimics the look of honey comb on this bee themed card.

I cut doubles of the wing layers so I could curl them and add dimension with pop dots. The wings were also coated with a layer of Stardust Stickles.

The inside of the card is finished off with scraps of the yellow polka-dot paper and this cute little bee is also from the Studio G stamp set.

That's it, please head over to Tracy's blog and see what

Challenge 

Tuesday, April 24, 2012

Sweet Butterfly Birthday

Today marks the start of another challenge over at Die Cuttin' Divas.
This week the challenge is:

I cut this scalloped card base. The base measures 4 1/4" and is welded on my Gypsy to form the card base. The scalloped circle I used is from Winter Woodland, but you can use any scalloped circle you like.  I always cut an extra card front to cover the folded edge of the card base. The circles measure as follows:
brown : 3 1/2" - also from  Winter Woodland
pink polka-dots : 3 1/4" - also from  Winter Woodland

This is the butterfly from Everyday Pop-up Cards. It's cut at 2".  I just had to accent the body with some self stick flat back pearls. Only the body is adhered to the card base.

I embossed the "Happy Birthday" from Scrappy Moms Stamps using white embossing powder. Adding some white gel pen stitches really brings the card all together. I added more pearls to each scallop on the card base. 

The adorable branch is from Cindy Loo cut at 3 1/2" (the leaves are double punched from a 1 1/2" circle punch). I inked the edges of the leaves and attached them with pop dots.

The dimension on this card is wonderful, with the leaves up on pop dots and the butterfly's wings popping off the card.  Because I sized the circle card to 4 1/4" it will still fit into an A2 sized envelope.... no extra postage required. 

We'd love for you to stop by Die Cuttin' Divas and enter the challenge!

The sponsor this week is The Crop Stop

Sunday, October 16, 2011

Fall Scene Card

I created this Fall Scene Card today. I've been a little of a creative funk... I needed to make a card for a DT post but made this one too. The card base is 5"x7" to get plenty of room for my scene. All the paper is from scraps! :)

This tree came from Everyday Pop Up Cards, cut at 3 1/2". I cut the base in yellow and using ink and a finger dauber, I tinted the outside orange to create this wonderful fall color! I cut leaves from Serenade in both yellow and orange and glued them randomly around under the tree.
The clouds are from Serenade as well, cut in random sizes from 1/2" to 2". I inked the clouds with blue and then with black on the bottoms. I don't know about everywhere, but here in Washington, it's super rainy in the fall and the clouds are gray... threatening to pour. The sentiment is printed using "Peanuts" font at 18 points.

I created this super fun pumpkins by using circle punches. Jess over at Kinder Stampo created some ornaments using this piecing method and I thought it would work on pumpkins too. I punched three of each circle, folded them in half and glued them together to create this form that can stand on it's own but fold down to mail. :)

These rolling hills are from Country Life (cut at 6 3/4" wide). I inked them before building my scene. The blue sky layer was inked too (using blue ink). I love the dimension on this card. 

Challenges:

Friday, September 23, 2011

Hot Air Balloon Birthday

I've loved this hot air balloon since the first second I saw it in the "Everyday Pop Up Cards" cricut book.  For this card I cut it at 4 1/4" high to fit on my 4 1/4" x 5 1/2" card.

The back ground hills and sun are cut at 4 1/4" wide from "Country Life". I inked all the edges of the hills and the sun using green or orange ink and my finger dauber.

I printed this adorable banner with the senitment and "pinafore" font. The cut it from the "Wedding" cricut solutions cart sized to 1 1/4" (to fit on the balloon), I then fit the sentiment to the banner.

The little clouds are from "April Showers" cut at 1 1/2" and 1", I inked those with blue ink as well as the background paper.

The inside would look naked with little of scraps of the patterned paper. :)

The blue polka-dot paper I used for the sky is a scrap of Heidi Grace paper, the starry balloon is from a DCWV stack called K&Co. Party stack. The rest is from my scrap bin. The last couple of things I did with this card is adding the white gel pen stitches and outlining the clouds, balloon and blue sky layer with Stardust Stickles.

Challenges:

Sunday, August 14, 2011

Butterfly birthday pocket card


Welcome to the Happy Birthday Deborah!!! SURPRISE Birthday Blog Hop! Today is Deborah from Scrapping Mammas Birthday! Some of her awesome friends have decided to have a BIG SURPRISE BIRTHDAY HOP since we can't all be in the same place for a SURPRISE party! This is the next best thing!


This blog hop is a one day blog hop to wish a very special woman (fellow crafter) a very special Happy Birthday. So Happy Birthday Deborah (aka Scrapping Mama).


If you are coming from Lisa at HoneyBearzDesigns, you’re on the right track. If you just joined us, you can go back to the beginning HERE 


~~~~~~~~~~~~~~~~~~

Now Let's get this party started!!

Here is the card Deborah will be getting in the mail: it's a pocket card, but the special thing about this card is the pocket part... it's a Chinese take out folded pocket.

If you want info about how to make this pocket, here is the video I watched... I know I used to fold these in school but was re-inspired today.  I started with an 8" x 8" piece of Heidi Grace paper, folded the pocket and then decorated it with DCWV's the Alphabet Stack.

I cut the monogram (along with the striped strip) and attached it after I added the glittered polka-dot paper to the triangle parts of the pocket. My triangles measured 3 1/4" each.

This beautiful butterfly is from Everyday Pop Up cards. I cut it at 2" using generic white and black card stock.  A strip of rhinestones really finish off the butterfly. I glued the body directly to the card insert, but rolled up a 1" piece of foam tape to hold the wings in place.

Here you can see the card insert... see how the polka-dots are on the inside of the pocket too... so cute.

I grabbed this plaid paper from the Alphabet Stack too. I really wanted to stick with the black, white and silver theme and love the mix of polka-dots and plaids! :)  The "Make a wish!" stamp (from Scrappy Moms, Simple Sentiments) is embossed on a little black triangle with silver embossing powder.

Because the card insert is a 3" x 3" black notecard, I added a 2 3/4" x 2 3/4" white panel to write on.  A little scrap of polka-dot paper was the perfect touch.

I just love the dimension on this card... best part is that with a careful hand, it will fit into a standard A2 envelope... no extra postage required.

~~~~~~~~~~~~~~~~~~

Before you jump on to Julie's blog, please comment for your chance to win my blog candy... I have a cupcake themed stamp set to giveaway... please be a follower and leave me a way to contact you.
Here is a list of the complete lineup for this hop:
Julie @ http://designs-by-julie.blogspot.com/  <--- your next stop
Brynn @ http://www.flairandfrillscreativity.blogspot.com/


Challenges: 
Creative Scrapbooking Divas : Fussy Cutting
I fussy cut the letter "d" with the horizonatal stripe from DCWV's Alphabet stack... so sorry, but I didn't get a "before" picture and it only includes one sheet per letter.
Simply Betty Challenge : Pockets

Tuesday, August 9, 2011

Butterfly Birthday Card

I cut this scalloped card base. The base measures 4 1/4" and is welded on my Gypsy to form the card base. The scalloped circle I used is from Preserves, but you can use any scalloped circle you like.  I always cut an extra card front to cover the folded edge of the card base. The circles measure as follows:
brown : 3 1/2" - also from  Preserves
pink polka-dots : 3 1/4" - also from  Preserves

This is the butterfly from Everyday Pop-up Cards. It's cut at 2".  I just had to accent the body with some self stick flat back pearls. Only the body is adhered to the card base.

I embossed the "Happy Birthday" from Scrappy Moms Stamps using white embossing powder. Adding some white gel pen stitches really brings the card all together. I added more pearls to each scallop on the card base. 

The adorable branch is from Cindy Loo cut at 3 1/2" (the leaves are from the same cut). I inked the edges of the leaves and attached them with pop dots.

The dimension on this card is wonderful, with the leaves up on pop dots and the butterfly's wings popping off the card.  Because I sized the circle card to 4 1/4" it will still fit into an A2 sized envelope.... no extra postage required. 

Challenges: