Showing posts with label Stretch Your Imagination. Show all posts

Tuesday, June 19, 2012

Summer here we come!

Today marks the start of another Die Cuttin' Divas Challenge!!
This weeks color theme is

All these pieces are cut from scraps! :)  I know the background yellow and red layer is from the DCWV summer stack from last year.  I thought it fit the summery/beach feel of this card well.

The sentiment is from Hero Arts "Big Hugs" stamp set.  I added a ribbon along the top and bottom of the sentiment box using my ATG tape. Two self stick black gems and a Prima Itty Bitty flower (with matching ribbon tail) finish off the sentiment block.

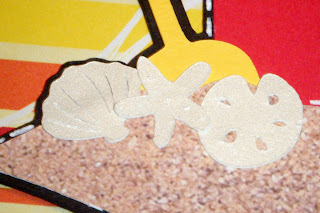
The sand pail is from Simply Charmed. I cut all layers at 2 1/2". The sea shells are from Stretch Your Imagination. I cut two sets of them at 1" out of white shimmery paper, giving them a lovely shiny fresh-from-the-ocean look. I added the shells to the sand pail layer and matched the shadows behind the shells where they came beyond the sand layer.

Here is a close up of the shells, sitting neatly on the sand layer (DCWV photo stack). I added white gel pen stitches and doodles through out the card. I use a Gelly Roll brand pen.

 The inside of the card also got some of the matching scraps.

We'd love for you to come on over and play along with us at Die Cuttin' Divas!
This weeks color theme is

The sponsor for the Challenge prize is

Friday, July 8, 2011

Sand Pail card

All these pieces are cut from scraps! :)  I know the background yellow and red layer is from the DCWV summer stack from last year.  I thought it fit the summery/beach feel of this card well.

The sentiment is from Hero Arts "Big Hugs" stamp set.  I added a ribbon along the top and bottom of the sentiment box using my ATG tape. Two self stick black gems and a Prima Itty Bitty flower (with matching ribbon tail) finish off the sentiment block.

The sand pail is from Simply Charmed. I cut all layers at 2 1/2". The sea shells are from Stretch Your Imagination. I cut two sets of them at 1" out of white shimmery paper, giving them a lovely shiny fresh-from-the-ocean look. I added the shells to the sand pail layer and matched the shadows behind the shells where they came beyond the sand layer.

Here is a close up of the shells, sitting neatly on the sand layer (DCWV photo stack). I added white gel pen stitches and doodles through out the card. I use a Gelly Roll brand pen.

 The inside of the card also got some of the matching scraps.

Challenges:
post signature

Tuesday, March 8, 2011

Easter Bunny Card


Here is a cute little Easter card I made today.  I love the shape of the card with the little scallops on the side! It's hard to see in this picture, but I inked all the edges of the card base.


I cut the bunny out of purple metallic paper and added stitches all around the bunny, his little basket and the card base. I love all the sparkle the glitter gel pen adds! :) I used Rio Purple for the "think Spring!" stamp. The bunny also got cute rhinestone eyes and glitter glue on the ears and nose.


I added some sheer ribbon topped with a satin ribbon to the side of the card.


Here you can see how I popped the bunny's head up on pop-dots. I also added a little bow to the top of the basket as well as cutting some "easter grass". I just used my scissors to cut fringe on a scrap of card stock and curled it around my pen before gluing it to the inside of the basket. I then filled the basket with eggs cut from scraps of the papers I used.

The inside of the card features "Happy Easter" cut in an adorable pink striped paper.
Like the front, the inside got plenty of gel pen stitches and ink around the edges.

Supplies:
generic black card stock 
purple card stock
polka-dot and pink stripe pattern paper is Heidi Grace
Purple metallic paper is DCWV
Bazzill purple textured card stock for card base
Sheer purple ribbon from Dollar Tree
thin pink satin ribbon from Michael's
Purple glitter gel pen for stitches
Scotch Quick Dry Glue
ATG glue runner & Zig 2-way glue
pop dots
"think Spring!" stamp is from Studio G
Rio Purple and ink dauber for the edges
Glitter Glue (like Stickles) by Studio G

Cricut Cartridges used:
Gypsy Wanderings for the card base (cut @ 4 1/4" x 5 1/2" welded and flipped with my Gypsy)
Additional layers cut at 4" x 5 1/4" and 3 3/4" x 5"
Stretch Your Imagination for the bunny and basket (cut @ 3 1/2")
Doodlecharms for the eggs (cut @ 1 1/2")
Simply Sweet for the words on inside (cut 1 1/4")

Challenges:


post signature

Wednesday, October 20, 2010

Gift Enclosure Cards

I made these adorable cards today.  I had a dream that I needed to make them, so when I woke up, it was the first thing I did after I got my kiddos on the bus to school! :)

All six of the 3" x 3" enclosure cards.

Santa from Doodlecharms, Gift from Create a Critter,
and Holly from Stretch your Imagination.

Penguin and Reindeer from Create a Critter
and Stocking from Christmas Cheer.

This is how I am packaging up the note cards,
 with a sheer white ribon.

"To" and "From" stamped on the inside of each card.
Stamp is from Scrappy Mom's Everyday Greetings.


Do you totally need a pack of gift enclosure cards?? They are now listed in my Etsy store at

Thanks so much for visiting me here at CardsbyCG.blogspot.com.  I'd love to hear what you think.  Feel free to become a follower or sign up for my email updates (provided through FeedBurner).  I'd love to share my crafting journey with you! - Cheryl

Tuesday, October 5, 2010

World Card Making Day!

Hi to all my friends in  blogging world!! There are a few new friends that have found me during the blog hop!
Welcome!

Last Sunday was World Card Making day.  It was during the Halloween Blog Hop so I didn't get around to posting these pictures, but I wanted to share them with you all today! :)

I sat down with my sons (5 and 8 years old) and we made some cards.


Here is the card my 5 year old, Owen, made.  He used Stretch Your Imagination for this snowman card.  He cut all card layers at 5 1/4" and the snowman layers at 2 1/4" then he stamped the sentiment (I helped him with the matting). Then he used a hole puncher to make the extra "snow" from silver mirror paper that matches the matting under the sentiment.

As you can see through the opening behind the snowman, he added his own doodling on the inside.

Create a Critter Turtle cut at 2 1/2"
Here is a card my 8 year old, Bryce,  made.  He has two classmates with birthdays this week.  Usually I work with him to make the birthday cards, but he wanted to make these two on his own.  (Okay, I added the black stitching after he was finished.)

Butterfly from Create a Critter cut at 3".
As you can see here, Bryce even added glittery stickles to the butterfly wings and mounted them up on Pop-dots.

Bryce made a third card using the sitting kitty from Create a Critter.  He made it for his teacher.  The inside of the card said "You are the best teacher in the whole world."  It was so cute watching him create!!!  Sadly, he was so excited to give his card to his teacher, that I wasn't able to take a picture.

If you have been visiting my blog very long you've also seen the card my wonderful Hubby made for Momo's Hubby Challenge awhile back.  If you missed it, it sure is worth the minute to check it out! :)

Thanks so much for visiting me here at CardsbyCG.blogspot.com.  I'd love to hear what you think.  Feel free to become a follower or sign up for my email updates (provided through FeedBurner).  I'd love to share my crafting journey with you! - Cheryl