Showing posts with label Halloween. Show all posts

Thursday, October 31, 2013

Happy Hallowen!!

Hi, and welcome to the Creepy Cricut Creations Blog Hop!!


 If you've come from Lori at Scrappin' My Stress Away, you are in the right place! If you just came across the hop, please start at the beginning over at Jenny's Blog, Crazy About Cricut.

 I absolutely LOVE crafting with my boys... so they sure helped out on this one! They love being involved and I enjoy the special time with them too.

My boys and I created this deconstructed witch wreath. They love it, we had a great time and it's now proudly displayed next to our front door. 


We stared with the following:
an 18" grapevine wreath
a fall leaves garland
some fall themed wired ribbon
a set of Halloween mini lights
a Glittered witches broom (from Joanns)
Cricut Cuts to decorate the wreath


My boys wrapped and wrapped. First we added the fall leaves garland, then the Halloween lights and then the wired ribbon. We used a little crafting wire to attach the decorations to the wreath when needed. We also wired the broom to the wreath (fyi: we sprayed the glittered broom with cheap-o Dollar Tree hair spray to keep the glitter from falling off).


Here are the cuts we decided to add to our wreath:
A witch hat from Paper Doll Dress Up
(cut at 8" wide)
Witches Shoes from  Paper Doll Dress Up
(cut at 3")
Happy Halloween from Holiday Cakes
(cut at 3")
Witches legs 
cut at 1 1/2" x 5" (we added alternating colored stripes)
Buckles from Fabulous Finds
(cut at 1")

We then ran our witch's pieces through our laminator (to protect them from the elements) and hung the wreath outside - it's under our deck but it doesn't hurt to protect our paper pieces.

  1. Jenny - http://crazyaboutcricut.blogspot.com/
  2. Lori - http://scrappinmystressaway.blogspot.com/
  3. Cheryl - http://cardsbycg.blogspot.com/
  4. Wandy - http://greenapplescrapper.blogspot.com
  5. Heather- http://paper-junkie.blogspot.com
  6. Sarah - http://sarahvaitstamps.blogspot.com
  7. Tracy - http://lovesbuggin.blogspot.com/
  8. Carol - http://www.workmanscraps.com
  9. Elizabeth - http://www.ejoym.blogspot.com
  10. Amanda- http://amandascraftsandmore.blogspot.com/
Your next stop will be
 Wandy at Green Apple Scrapper!

Monday, October 28, 2013

DIY Bigfoot Costume for a Bigfoot Fanatic!!

Hi everybody!!
My son, Owen, as bigfoot.
Today I finally have a minute to have share the costume that I created for my 8-year-old Owen. He has been into Cryptozoology for over a year and he REALLY wanted to be Sasquatch for Halloween this year. I will take this blog post to take you on our Bigfoot Costume Journey! :)

We started with an Incredible Hulk mask ($2 from Goodwill) and a Bear in the Big Blue House ($10 at a re-sale) Disney Store fur suit costume. 
First I altered the Bear Costume to fit my son. it was about 2 sizes too big, I removed the face, the bean-bag belly and bottom, and used scraps to cover the yellow chest.

Here is the fur suit after the alterations. You can also see the unaltered Hulk Mask. :) I added bulk to the hood area to give him the Bigfoot shaped head too. 


I bought quite a few cans of fabric spray paint from Joanns (I used the 40% off coupon and they were still over $6 each). I used dark brown, medium brown and black. After many layers of paint and lots of money spent, I resorted to good old spray paint. It was smellier, but with the pre-planning I did, the smell has subsided well. You can see in the first picture, I have the costume hung on a hanger, but I found the coverage was much better when I stuffed the costume with paper. The dimension helped get even coverage without folds in the fabric.


 For the mask, first I sprayed the mask a combination of browns and black. Then I used scraps of the fur suit to add the fur around the Hulk face. I then touched up the fur.

With all that wonderful spray paint, the teeth were quite brown.... So we first added some off-white acrylic paint and then added some glow-in-the-dark paint.

Onto the feet!!!  I bought these feet on Ebay. They are a little hard to come by. They are called "Funny Feet" and were perfect for this costume!! First I cut off the tops and glued them to the tops of a pair of my old shoes. Owen needed slip on shoes with these feet, and I was the only one who had a spare pair.

Here, I used E6000 glue to attach the funny feet to the tops of the slip-on shoes. In case you were wondering, I had about a week from the time I ordered these feet to when they came, so I pre-painted my shoes for this project. 
I used zip-ties (or cable ties) to hold the tops onto the shoes while the glue dried. We let these set about two days. It was super hard the wait for the next step!!

Okay, first I tried spray painting these feet... don't do that.... it doesn't work.... the paint and the silicone material these feet are made of don't get along!! So the second step was strip all that spray-paint and apply one coat of acrylic primer and three coats of brown acrylic paint. 

The next step was to apply the toenails. I painted two coats of the toenail color (we used a cream color). Then I added a very fine mist of cream spray-paint to create a dirty look. Then, I applied two coats of an acrylic sealer.

See, look pretty Squatch-y don't they?? In case you were wondering, these measure roughly a size Men's 11!! Because they are mounted up off the toe, my eight-year-old had no problems walking in them... in fact, he had no problem running and playing in them!

Here is the completed mask/hood look. On Halloween, we are going to be underpainting Owen's eye's a brown so they don't stick out as much.

Here is Owen doing the classic bigfoot stance as seen in the Bluff Creek, CA pics by Patterson/Gimlin in 1967. See those impressive feet sticking out?? They make me so happy!!

And lastly, here is the candy bag Owen will be toting all his goodies in.... and in case anyone thinks he is a monkey, bear, or Chewbacca, it says he is a BIGFOOT!!!

I used two bandannas for the bag body (measuring 11' x 14 1/2") and lined it in black cotton. I created the logo using Photoshop and printed it on iron-on paper. I then ironed it onto yellow cotton and stiched it down to the camouflage fabric before sewing it into the bag.  Owen wanted it to be reversible, so we made another yellow logo panel for the black inside layers. Lastly, we added a black nylon cross-body strap so he doesn't have to hold it while trick-or-treating.

Here are some quick "before" and "after" pics I just had to share:


And in case you were wondering, before we started this costume we were searching and searching for a diy, instructions or tutorial for a Sasquatch or Bigfoot costume and THERE WERE NONE TO BE FOUND!! So, this costume run-down is our contribution to all those other people looking for directions for creating their own Bigfoot costume. :)

Sunday, October 21, 2012

Purple People Eater Treats

Thanks for joining us for our

If you just stumbled in on our wonderful blog hop, please jump over to Nicolette's blog at Beyond Scrapin' so you don't miss a thing.


"It was a one-eyed, one-horned, flyin' purple people eater
(One-eyed, one-horned, flyin' purple people eater)
A one-eyed, one-horned, flyin' purple people eater
Sure looks strange to me!"
Sheb Wooley, 1958
I created this treat box today... the song lyrics repeating in my head
over and over. I cut the nut cup from Tags, Bags, Boxes
and More (at 6", the largest it could go to fit on my 12" X 12" cutting mat).

The purple monster is from Mini Monsters, it started out as a three
horned monster, but to go with the song, I HAD to alter him. :) He's
cut at 3" - I only used scraps for all the monster parts.

This yellow and orange striped paper is from a .97 cents Studio G
paper pack. I backed it with some yellow card stock. I just knew that it would 
need the extra support. I used Sticky Strip to hold it all together and added 
some foam tape to attach the monster parts.

I hand cut this little tag and used a Inkadinkado stamp from last year. 
I attached it to the orange ribbon handle with a simple brad.

Here is my monster's tail. This has got to be my favorite monster from 
the Mini Monsters cart. I think this is like the third time I've cut him.

Some black stitches finish off the treat container. I used a black Glaze pen make by Sakura (Gelly Roll). Add some candy and you are good to go! :)

Thanks for stopping by, please don't forget to comment for your chance to win a prize goody bag. Leave an email address 'cause I'll drop you an email if you win!! :)

Your next stop is:

Saturday, October 20, 2012

Halloween Monster Hoodies

Thanks for joining us for our

If you just stumbled in on our wonderful blog hop, please jump over to Nicolette's blog at Beyond Scrapin' so you don't miss a thing.


 Here is what my boys and I came up with. My boys and I made
MONSTER HOODIES!

Here is what you'll need for this project:
A Hoodie - recycled is best, but I bought ours at Walmart for $10 each
Felt - we used black, white, red and green - .25 cents a sheet at Walmart
Fabric Glue - we used "Aleene's super fabric glue"
Scissors
sewing machine is optional if you want to have a super secure hold
(if you want to make matching gloves, grab some of those too)

 Here is the video we used as inspiration:

As much as we loved "Thread Bangers" version of a monster hoodie, we changed up the eyes, added a tongue and Owie (my 6 year old) said he just needed spikes down his back.


We also sewed our parts down after my boys glued them where they wanted them. I know this step may not be needed, I know my kids... this hoodie will be worn and loved and need to be washed. :) I knew it would be much more likely to come out of the washer in one piece if the parts were sewn down.


We tried to match the thread colors up with the felt pieces, except for the teeth row, for this layer we matched thread with the hoodie color.

To help the spikes stand on their own, we sewed them together down the points.

Here is the finished hoodie for my oldest son, Bryce. He is nine. The tongue on his monster is snake-like and he wanted a more "furious" monster so he picked red for his eyes.

I love the little shine we added to the monster's eyes. :)

See how the spikes stand up? Both of the boys settled on three body spikes and two head spikes.

Here is Owie's (my 6 year old) monster. He chose green eyes - to match his own eye color. I love that he chose red for his spikes, they really show up against the gray hoodie.

You can see how his eye shape is different than Bryce's. His tongue is wider too but they both wanted them forked.

Here you can see the stitching lines. A very special "thank you" to my sister who helped out with the sewing! I now have a special order to make a monster hoodie for my nephew! :)

 
I love that my boys love these hoodies enough to NOT save them for Halloween. :)

And here are my little monsters... making their brand new monster personas wrestle! :)

We also made matching monster gloves... what's a monster without claws? We cut more spikes and added some claws - attached everything with fabric glue. Let it dry and you are good to go.

Here is Bryce's monster hands (hiding behind my handmade gravestones in the front yard).

Here are Owen's gloves... be sure to match your spike color to your Monster Hoodie. Owen suggested we add the claws using those el-cheep-o acrylic nails but I didn't want sharp nails if they are planning to wear these to school.

And here are his gloves... the gravestone says "Here lies the invisible man... I think!"

Thanks for stopping by, please don't forget to comment for your chance to win a prize goody bag. Leave an email address 'cause I'll drop you an email if you win!! :)

Your next stop is:

Wednesday, October 27, 2010

Halloween is in the Air - CJT DT Project

If you've been following my blog recently, you know that I am now a very proud member of Tracy's design team over at Craft Junkie Too.

Tracy asked the design team for this week to design a Halloween project with one specific request: it had to be a project that can be hung on a fence, wall, in the trees etc.  She called the theme:

Halloween in is in Air!

Here is my project: I made a flying bat made out of mostly recycled supplies (which I LOVE)!!

Here are the supplies you'll need:


2 milk jugs
2 black garbage bags
around 5 feet of pvc pole, recycled dowels, metal tent poles, or even a tree branch
7 zip ties
 a small amount of Cricut vinyl
a small amount of recycled cardboard
2 large sequins
clear packing tape
a pair of scissors


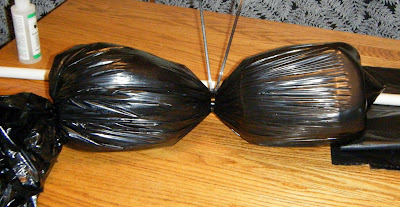
Step 1: Stack the milk jugs like the above picture and put them in the garbage bag.


Step 2: Cinch the garbage bags at the bottom of the milk jugs and in the center using zip ties.  Here I used two zip ties in the center (one around the mouth of each jug). Trim off the "tail" of the garbage bags.


Step 3: I used the Cricut Vinyl to make the eyes and fangs.  I cut a 2" and 1 1/4" circles for the eyes using the "center point" feature.  The fangs are cut from  a 3" star.  All cuts were using Plantin Schoolbook.


Step 4: Using the second garbage bag, cut wings.  I cut the wing shapes freehand while the bag is still whole.  I lay out the bag and cut the pieces before separating the seam so that the wings are matching.  Then, I cut the bag at the seam.

Here are the wings after cutting the seam.  See how they match?


Step 5: Attach one wing to one end of the pvc pole (or whatever you choose to use as the wings). I fold the flat side of the wing over the pole and tape with packing tape.  Make sure that the tape is attached to the pole too, so that the wing won't slip off the ends.


Step 6: Slip the end through the handle of the milk jug.  You may have to cut a slit in the garbage bag 
covering the milk jugs to do this step.


Step 7: Attach the second wing to the pole, again using the packing tape.


Step 8: Add a couple of zip ties to secure the pole in the milk jug handle. I like to criss-cross the zip ties (see picture).


Step 9: Cut a couple of ears for your bat.  I cut them from cardboard and wrap them in scraps of the garbage bags using glue runner.  Fold over the fat ends and tape them to the sides of the jug.


Step 10: Add the sequins to the center of the eyes.  Here I have used glittery green sequins.


To hang your new bat:

Attach zip ties to the center of the bat body (at the milk jug handles) and one on each bat wing to hang him/her up in the trees.  I usually add some string to hang my bats.

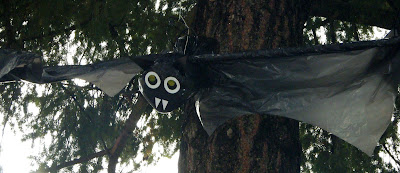
Here is my bat hanging in the day time.

And here he is hanging at night. 
If you are REALLY creative, it would be wonderful to hang your bat using a pully so he can swing down and scare the trick-or-treaters!!! :)


Thanks so much for visiting me here at CardsbyCG.blogspot.com.  I'd love to hear what you think.  Feel free to become a follower or sign up for my email updates (provided through FeedBurner).  I'd love to share my crafting journey with you! - Cheryl