Showing posts with label Preserves. Show all posts

Tuesday, October 30, 2012

Falling Leaves Shaped Card

Today marks the start of another Die Cuttin' Divas Challenge!!
This weeks theme is:

 I'm not sure what to call it, but for now I'll call this card a Shaker Window Card. : )
As you can see, it's a shaker card. I put two layers of foam tape in between two layers of Recollections Clear Window Sheets. I them sandwiched the plastic shaker between my paper window layers. All paper is from Me & My Big Ideas specialty card stock called "Harvest".

Inside the shaker, I added some leaves from Serenade and some Recollections microbeads to help the leaves move inside the window. I added three brown brads to each side.

Here you can see the card shape. I love this tag shape! :)  I cut a little hill by hand from some more paper from the same paper pack. 

Here you can see the velvety texture of the green hill.

This little sentiment is stamped using Memento Tuxedo Black and a Studio G stamp.

We'd love for you to come on over and play along with us at Die Cuttin' Divas!
This weeks theme is:

Monday, August 20, 2012

Summer Sheep Scene Card

I am a VERY proud new member of Cori's Design Team over at Ginger Snaps Scraps and today I have a fun card to share with you!

For my project today, I am featuring this summery county sheep card.
I just love summer!! For this card,  I used Preserves for the card base and the black and cloud layers.  The card measure 4 1/4 x 5 1/2". All the solid paper is Bazzill Cardstock.

I used Glossy Accents on the sun and Stardust Stickles to line the clouds. I used my white gel pen to stitch around the black layer (big surprise, huh!)  :) The background cloud layer is from Echo Park - so sorry, I don't have the paper pad name anymore.

I didn't have any yellow rhinestones, so I used clear ones and colored them in with a yellow Sharpie. 

The sheep is cut out using white DCWV glitter paper and then ran it through my Swiss dots embossing folder.  I also embossed the largest and smallest hill in the background.

I inked the edges of all layers on the hill in greens, the clouds (and cloud background) in blue, and the sun in black.

Supplies Used:
Bazzill card stocks for all solid layers
Craft paper for the card base
Cloud paper for the cloud mat
pink flower brads
DCWV glitter paper (for the sheep)
Stardust Stickles
Glossy Accents
Scotch Quick dry glue
3M ATG glue runner
various inks to ink the edges

Cricut Cartridges Used:
Country Life : sheep cut at 1 1/2" tall
County Life : hills/sunshine cut at 5 1/4" wide
Create a Critter : clouds cut at 1", 1/2" and 3/4"
Preserves : scallop top label - welded with my Gypsy

We'd love if you'd jump over to the Ginger Snap Scraps blog and check out what the other DT ladies have come up with.  Don't forget you can pick up lots of papercrafting supplies at

Sunday, August 19, 2012

Ladybug Scene Card

Hi! Thanks for hoping with us along
 Flowers and Ladybugs Blog Hop (Day2)!! 

If you came from Nicolette's blog (Beyond Scrapin'), you are in the right place.
If you just came across this hop and would like to start from the beginning, please go back to Nicolette's blog (Beyond Scrapin').


Today I have a wonderful little card to share with you. At the end of this post, I'll share the Cricut Cartridges and stamps I used.  


I added lots of dimension under the leaves using some mini-pop-dots. I just love the polka-dot back ground paper I used to represent the sky! :)


See all the dimension.  This isn't the prettiest view of my card, but it really shows how I popped up selected leaves on the tree branches.


I added little pearls to the center of all the flowers and gel pen stitching to the dark blue mat. 


Instead of a ribbon, I embellished this card with a strip of lace! :)


Here's the cute little ladybug!  She's also attached with pop dots.


This is the inside of the card.  See how I added additional flowers and leaves! So cute.

Supplies:
generic white card stock base
dark blue card stock
blue polka dot paper is Heidi Grace
pink patterned paper (flowers) is also Heidi Grace
Liquid Pearls for the flower centers
Lace I picked up at a thrift store
Gelly Roller white gel pen
Scotch Quick Dry Glue
ATG glue runner
pop dots
inside birthday sentiments are Hero Arts : Big Hugs
"Hi!" is TPS Studio

Cricut Cartridges used:
Doodlecharms for Ladybug (cut @ 1.33")
Serenade for tree and leaves (cut @ 7")
Serenade for flowers (cut @ 1/2")
Preserves for card base (cut and welded @ 4 1/4" x 5 1/2")
Preserves for blue bg layer (cut @ 4" x 5 1/4")
Preserves for blue polka-dot layer (cut @ 3 3/4" x 5")


Thanks for visiting me today. 

Before you jump to the next stop, please leave a comment
(and don't forget your contact info) 
to be entered in my drawing for some blog candy...
a $20.00 gift card to either
Michael's or Joanns -- winner's choice!!!
Drawing will take place on Monday, September 4th, 2012.
- I have another blog hop next week and will email all the winners at the same time-
FYI: I don't post winners to my blog, I email the winner(s) directly.


Your next stop in the blog hop is:
Ashley @ The Blog Hop Princess

Here is the whole lineup for this blog hop:

Tuesday, August 7, 2012

Flower Garden Card

This is my second post for today, please scroll down for the Die Cuttin' Diva's Challenge.

I am a VERY proud new member of Cori's Design Team over at Ginger Snaps Scraps and today is my very first DT post!! I have a fun card to share with you today!

I made this card for my Grandma-in-Law (my hubby's Grandma), she's turning 89 this week and I hope she'll enjoy this cheery card. I created the card base using a tag from Preserves (sized to 5 1/2" x 8 1/2" - nice and big for all the kids, grandkids and great-grandkids to sign). 

The adorable flowers are from Garden Soup, cut to 1 1/2" RDS and I added this too-cute Peachy Keen faces from the Everyday Character Face Assortment. The clouds are from Pooh and Friends, the flower stems and sun are from Create a Critter, and the grass is from Plantin Schoolbook.

I just love these little faces, but any Peachy Keen faces would look ADORABLE!! I used my white gel pen to add some detail and character all over the card, I couldn't forget the whites of the eyes. I inked the edges of the pieces with a like color and a sponge dauber. I just love how the inking shows up on the Bazzill Cardstock.

This adorable sentiment stamp is from Hero Art's stamp set called Everyday Sayings.

We'd love if you'd jump over to the Ginger Snap Scraps blog and check out what the other DT ladies have come up with.  Don't forget you can pick up lots of papercrafting supplies at

Tuesday, July 31, 2012

Blueberries Birthday Card

Today marks the start of another Die Cuttin' Divas Challenge!!
This weeks theme is

I've been finding myself making lots of shaped cards lately.... and my go-to shape is a tag. Today is no exception.

This wonderful card was inspired by my 7-year old.  He has a Great-Uncle that has these wonderful HUGE old growth blueberry bushes in his back yard.  When my boys were little, their Uncle would happily take them to go pick blueberries in his yard..... When I asked my son what kind of card we should make for Uncle Robbies's birthday, he said "we have to make him a blueberry card!"

All cuts are from Preserves.  The tag card base is sized to 4 1/4" x 5 1/2, and then welded on my Gypsy.   The navy blue card mat measures 4" x 5 1/4" and the green patterned paper measures 3 3/4" x 5".

The blueberries are cut at 3 1/2" and I inked all the layers before assembling them (green ink on the leaves and blue ink for the blueberry layers). I attached the cluster of berries with pop dots and three leaves are up on pop dots too. Gel pen doodle-dots are one of my favorite touches. :)

A scrap of the card base punched with an old tag punch became the perfect sentiment tag.  This "happy birthday" stamp is from Studio and it's been embossed using white powder. More doodles, a few pop dots,  a navy colored brad, and some blue 1/8" satin ribbon finish off the bottom of the card.

I tried to keep the embellishments to a minimum to keep it more of a manly card... I don't know how masculine it turned out, but I love it anyway.

The inside got some scraps of the outside paper and matching inking and gel pen details. All paper came from my scrap bin except for the green patterned paper. It's from DCWV's Cafe Mediterranean mat stack. I know that the blue textured paper that I used for the card base is Bazzill card stock.

We'd love for you to come on over and play along with us at Die Cuttin' Divas!
This weeks theme is

The sponsor for the Challenge prize is

The prize is $20 to use in her store!!

Tuesday, June 26, 2012

Summer Strawberries are HERE!!

One of my family's favorite thing about summer is the fresh berries growing juicy and plump in our yard! We've been picking strawberries, raspberries and the blue berries are almost ready!! :)

When I saw the new Die Cuttin' Diva's theme was to use a fruit or veggie that represents summer, I went with our favorite; Strawberries!!

I have the adorable card to share with you today! :) All the card layers were made from SCRAPS!! Gotta love that! The strawberries are from the Preserves cart (cut at 2 3/4"). I used a tag from Preserves to create the card base shape.  I welded two tags together and then created two additional layers for the card base.

I inked the layers of the strawberries and the green polka-dot layer before assembling the card. The strawberries are reversed embossed with the swiss dots folder. When I put the berries together, I added the leaves and flower with pop dots and couldn't resist the little green button. I love accenting with the white gel pen, and this card is no exception! :)

I created the sentiment on my computer using the Floral font at 18 points and inked the edges. I used a Fiskers border punch for the white trim and them attached it to the card base with pop dots.

I added some more of the green polka-dot paper (by Heidi Grace) and white border to the inside of the card. 

We'd love for you to come on over and play along with us at Die Cuttin' Divas!
The sponsor for the Challenge prize is

Wednesday, April 25, 2012

Bee Happy

Today is another Craft Junkie Too Design Team day. I can't even begin to tell you how much I love being on Tracy's Design Team!! Her awesome assignments are just a small part of it. 

 The challenge for this week is:
Designer's Choice

I LOVE shaped cards and this is one of my favorites. I grabbed a tag shape from Preserves and sized it to an A2 card base (5 1/2" x 4 1/4"). Adding some layers is a wonderful technique. I inked the yellow honey-comb-like layer with some brown ink.

This adorable and simple bee is from Everyday Pop Up cards, cut to 3" the size fits perfectly into the shape at the top of the card.

This wonderful sentiment is from a Studio G set I grabbed at Joann's for $1. The black and white ribbon is from my stash. I just love how the polka-dot ribbon mimics the look of honey comb on this bee themed card.

I cut doubles of the wing layers so I could curl them and add dimension with pop dots. The wings were also coated with a layer of Stardust Stickles.

The inside of the card is finished off with scraps of the yellow polka-dot paper and this cute little bee is also from the Studio G stamp set.

That's it, please head over to Tracy's blog and see what

Challenge 

Tuesday, February 21, 2012

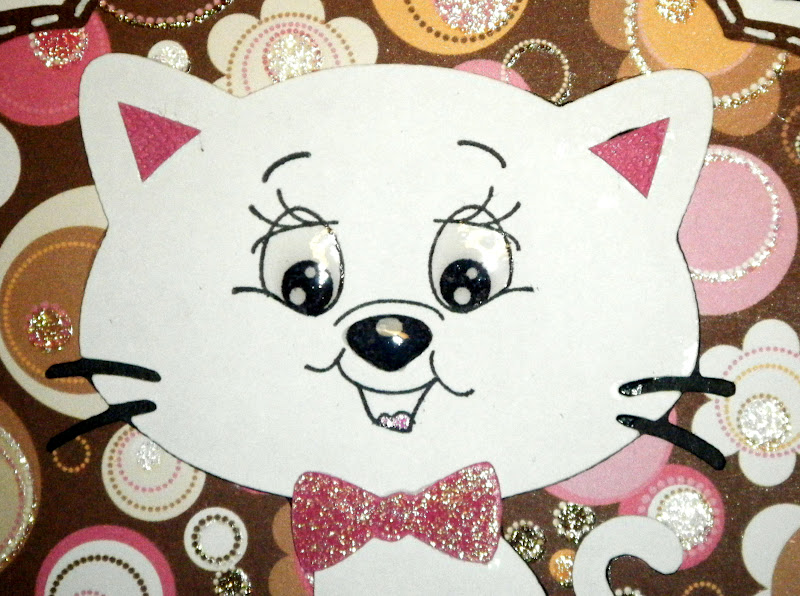
Have a purrrrrfect birthday!

Today marks another Die Cuttin' Divas challenge. This week it's:

Theme challenge : Pets

I love shaped cards and lately I've been into the tag shaped ones. This card base is created using the scalloped top tag shape from Preserves (sized to 4 1/4" x 5 1/2") but you can use any tag shaped from any other cart too. I used my Gypsy to weld the shapes together. The additional layers are sized to 4" x 5 1/4" and 3 3/4" x 5" using the real dial size feature on my Gypsy. I love the layered look! :)

The adorable background paper is from DCWV's glitter stack.

I created the sentiment tag in Photoshop. I love to vary the fonts in a single sentiment and I couldn't resist using a pink outline and a drop shadow too. I punched it out using a McGill Multitags, Scallop punch. I attached the tag using pop dots.

I tied the little white satin bow using my Bow Easy.

I used the largest face stamp in Peachy Keen's Wide Eyed and Bushy Tailed Face Assortment (1 3/8").
I added a pink tongue with a pink Glaze pen, and shine to the eyes and nose with some Glossy Accents. A also used Star Dust Stickles on the bed trim and the bow tie.

Now please take some time this week to create and link up on the
The theme is a Pets!
The prize this week is from Paper Piecing by Nikki

Tuesday, November 22, 2011

Dreamcatcher Tent style Christmas card

Today marks the start of the new Die Cuttin' Diva's challenge. This weeks theme is:

Although this card doesn't scream Native American Heritage, the dreamcatcher is very important in Native American lore. It's believed that when they are hung in the window it catches the bad dreams and lets the good dreams through. My boys each have one I made long ago, but I recreated an old project to make Dreamcatcher ornaments for this card.
This tent fold card measures 4 1/4" x 5 1/2". The adorable card front cut out measures 4" (from Preserves).  The card front layer is a Christmas polka-dot paper from the loose paper stacks at Joann's. I also used some DCWV green glitter paper for the green frame and I added a layer of white glitter paper to the back of the card base (behind the Dreamcatcher). It adds a wonderful shine, that really compliments the glitter in the tulle and frame.


I used some tulle and elastic cording to make this little "bow". The little sentiment is a Studio G stamp I stamped using Memento Tuxedo Black, and mounted it on the same DCWV green glitter paper I used for the frame. A little hot glue held it to the card base.

 Here you can see how the card stands on it's own.  The way the card is folded, it will flatten out to fit into a standard A2 envelope.  
I simply punched a hole using my large Crop A Dile and threaded the ornament string to the back. I secured it with a little scotch tape so it can be removed and placed on the Christmas tree.

Please head over to Die Cuttin' Diva's and enter the new challenge.