Monday, October 28, 2013

DIY Bigfoot Costume for a Bigfoot Fanatic!!

Hi everybody!!
My son, Owen, as bigfoot.
Today I finally have a minute to have share the costume that I created for my 8-year-old Owen. He has been into Cryptozoology for over a year and he REALLY wanted to be Sasquatch for Halloween this year. I will take this blog post to take you on our Bigfoot Costume Journey! :)

We started with an Incredible Hulk mask ($2 from Goodwill) and a Bear in the Big Blue House ($10 at a re-sale) Disney Store fur suit costume. 
First I altered the Bear Costume to fit my son. it was about 2 sizes too big, I removed the face, the bean-bag belly and bottom, and used scraps to cover the yellow chest.

Here is the fur suit after the alterations. You can also see the unaltered Hulk Mask. :) I added bulk to the hood area to give him the Bigfoot shaped head too. 


I bought quite a few cans of fabric spray paint from Joanns (I used the 40% off coupon and they were still over $6 each). I used dark brown, medium brown and black. After many layers of paint and lots of money spent, I resorted to good old spray paint. It was smellier, but with the pre-planning I did, the smell has subsided well. You can see in the first picture, I have the costume hung on a hanger, but I found the coverage was much better when I stuffed the costume with paper. The dimension helped get even coverage without folds in the fabric.


 For the mask, first I sprayed the mask a combination of browns and black. Then I used scraps of the fur suit to add the fur around the Hulk face. I then touched up the fur.

With all that wonderful spray paint, the teeth were quite brown.... So we first added some off-white acrylic paint and then added some glow-in-the-dark paint.

Onto the feet!!!  I bought these feet on Ebay. They are a little hard to come by. They are called "Funny Feet" and were perfect for this costume!! First I cut off the tops and glued them to the tops of a pair of my old shoes. Owen needed slip on shoes with these feet, and I was the only one who had a spare pair.

Here, I used E6000 glue to attach the funny feet to the tops of the slip-on shoes. In case you were wondering, I had about a week from the time I ordered these feet to when they came, so I pre-painted my shoes for this project. 
I used zip-ties (or cable ties) to hold the tops onto the shoes while the glue dried. We let these set about two days. It was super hard the wait for the next step!!

Okay, first I tried spray painting these feet... don't do that.... it doesn't work.... the paint and the silicone material these feet are made of don't get along!! So the second step was strip all that spray-paint and apply one coat of acrylic primer and three coats of brown acrylic paint. 

The next step was to apply the toenails. I painted two coats of the toenail color (we used a cream color). Then I added a very fine mist of cream spray-paint to create a dirty look. Then, I applied two coats of an acrylic sealer.

See, look pretty Squatch-y don't they?? In case you were wondering, these measure roughly a size Men's 11!! Because they are mounted up off the toe, my eight-year-old had no problems walking in them... in fact, he had no problem running and playing in them!

Here is the completed mask/hood look. On Halloween, we are going to be underpainting Owen's eye's a brown so they don't stick out as much.

Here is Owen doing the classic bigfoot stance as seen in the Bluff Creek, CA pics by Patterson/Gimlin in 1967. See those impressive feet sticking out?? They make me so happy!!

And lastly, here is the candy bag Owen will be toting all his goodies in.... and in case anyone thinks he is a monkey, bear, or Chewbacca, it says he is a BIGFOOT!!!

I used two bandannas for the bag body (measuring 11' x 14 1/2") and lined it in black cotton. I created the logo using Photoshop and printed it on iron-on paper. I then ironed it onto yellow cotton and stiched it down to the camouflage fabric before sewing it into the bag.  Owen wanted it to be reversible, so we made another yellow logo panel for the black inside layers. Lastly, we added a black nylon cross-body strap so he doesn't have to hold it while trick-or-treating.

Here are some quick "before" and "after" pics I just had to share:


And in case you were wondering, before we started this costume we were searching and searching for a diy, instructions or tutorial for a Sasquatch or Bigfoot costume and THERE WERE NONE TO BE FOUND!! So, this costume run-down is our contribution to all those other people looking for directions for creating their own Bigfoot costume. :)

Saturday, September 28, 2013

Lego Mini-fig Head and a Blog Hop

Hi, and welcome to the Cricut Crafts Blog Hop!!
 If you've come from Heather at Paper Junkieyou are in the right place! If you just came across the hop, please start at the beginning over at Jenny's Blog, Crazy About Cricut.

Okay, time for my project:


My son, Bryce, just celebrated his 11th birthday and his favorite thing right now is LEGOS!!! Do you have one of those kiddos too??

Anyway, I designed a Lego Mini-figurine head card for his birthday. While there is no Lego Cricut Cartridge, I had to come up with something....

Using my Gypsy, I combined some images from both Robotz and a couple periods and 1/2 of a parenthesis from Plantin School Book for the smiley mouth. I welded two of the Robotz image, flipping one upside down, to create a shape very close to the shape of a Lego Mini-Fig head.

I set the file up to cut the face (with the eyes and smile cut outs) on the left and the background face piece of the right. The card base was set-up on layer 2 on my Gypsy. I welded two of the background pieces together to form the folded base.

Here you can see all the parts ready for assembly. I sized the head to be 4 1/4" wide and just over 5 1/2" tall, you'll see why in just a couple steps.

So, I folded the base and I was ready for assembly. Like the Create a Critter carts, this card became very easy to assemble. :)

See, easy and quick assembly. :) Okay, so the bottom bump (called studs) on the Lego Mini-Fig head was a little long... so I used my paper trimmer to cut the card to 5 1/2" so it can fit in a standard A2 card. Don't forget to round the corners with a corner chomper or just by hand.

I added some details and doodling with my Sakura White Gel Pen.

Then, using the same face files, sized to 1", I made some Mini-fig confetti to put inside the card. Since Bryce was turning 11, his card was filled with 11 little friends. :)

If you'd like the Gypsy file for this cute little Mini-fig card, please let me know. I'd be happy to share.

Don't forget to comment on all six blogs of the hop for your chance to win one of these wonderful prizes:

$5 GIFT CERTIFICATE TO JADED BLOSSOM!

or 

5 PACK OF ACTION WOBBLES!

Your next stop will be Cindy at Cindy's Green Cricut!
 
Here is the line-up: 
Heather- paper-junkie
Cheryl - cardsbycg

Thanks for joining us today for

 the Cricut Crafts Blog Hop!!

post signature

Monday, June 24, 2013

Lego Mini-fig Storage


Hi everybody,

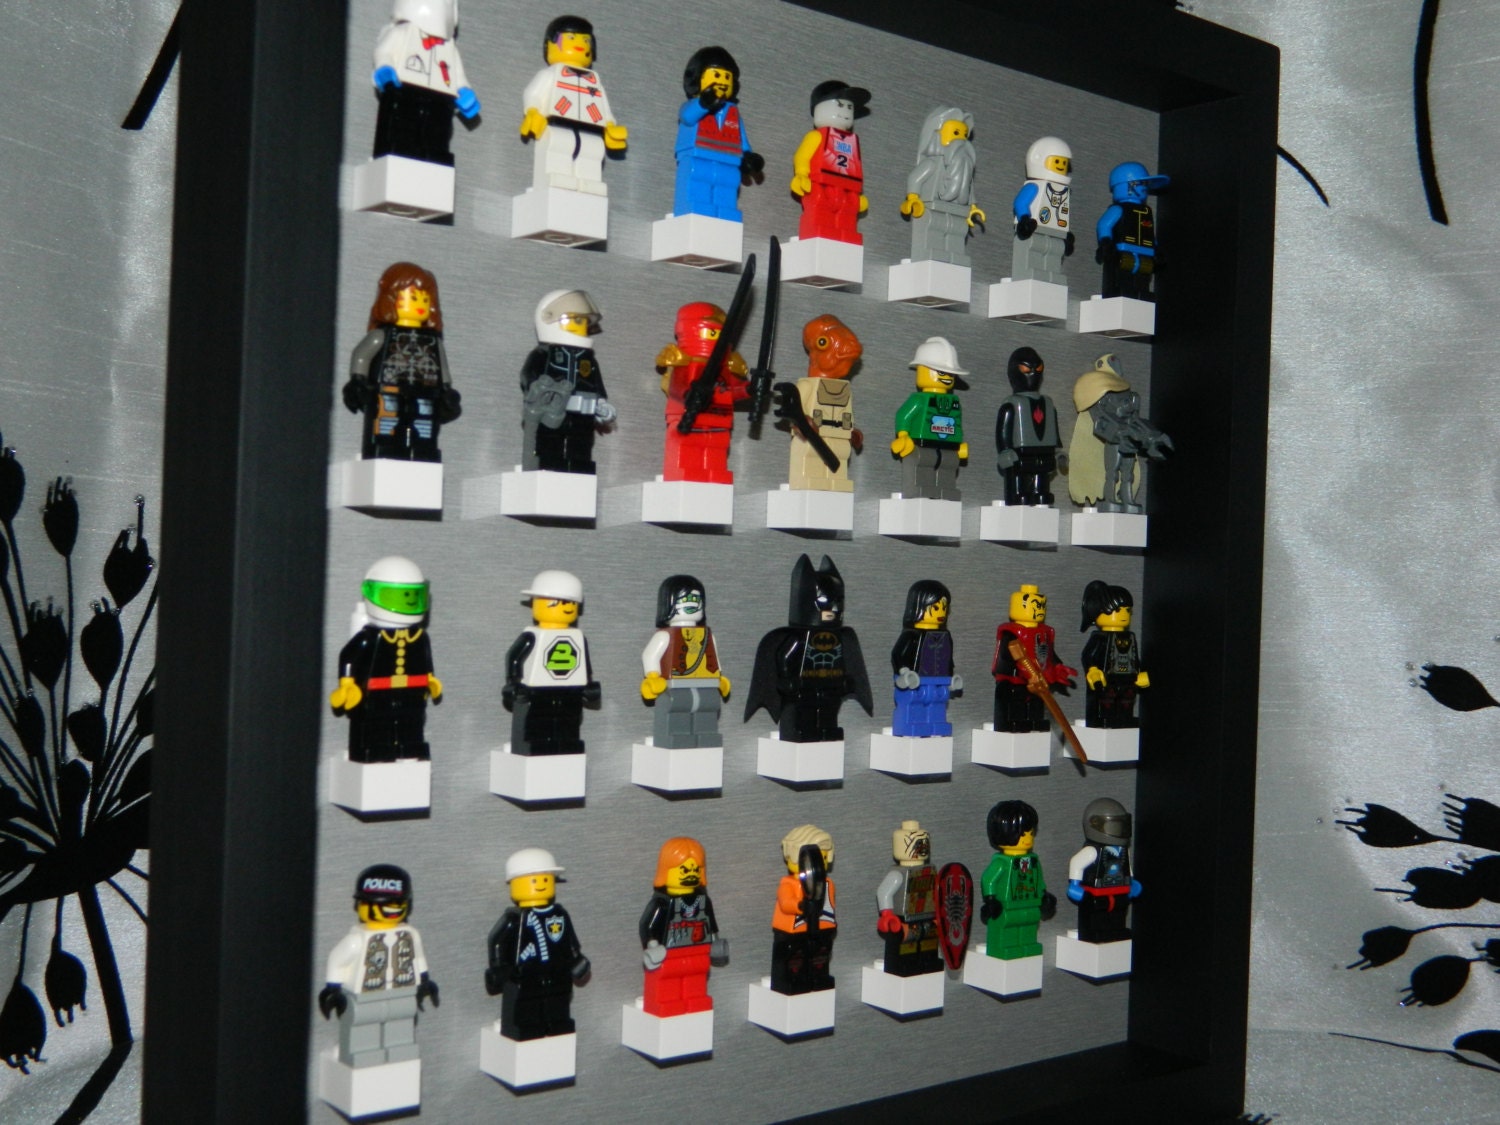
Today I have a super fun project to share that was entirely inspired by my son, Bryce. He loves his Legos and been collecting Lego Mini-Figurines (Minifigs) for about a year now. He loves those little mystery ones in the foil pack but has some more rare ones too. Anyway, he wanted a way to store his minifigs so that he can see them, but still take them down and play with the occasionally. :)


This project was inspired by an Etsy item I found, I'll include that link at the bottom of this post in case the project is a little too involved for you (or the Lego Lover in your life).  Okay, on to the project. 

You'll need the following supplies:
- a shadow box, either store bought, or thrift-store find like we did ($2 each @ Value Village)
- Spray paint for your frame - if it was a thrift store find or you'd like to change the color
- the backer for your frame (or wood, cut to fit, if needed)
- Spray paint for the backer board
- 2x2 Legos in the color of your choice (we used 42 of these found on Ebay)
- Saw-tooth picture frame hangers

Since we found our 16" x 20" frames for $2 at Value Village, we needed spray paint to make them match the room they are going to be living in. In my son's case, we are painting his room right now, and he is WAY into orange, so we went with an orange backer, orange Legos and a black frame. Three coats of black paint and the frames were good to go. :)

We cut our 1/4" birch plywood to fit the inside of our frames and sprayed them with Island Orange by Valspar. Here, Bryce is modeling how well it matches his orange shirt. :)

Next, we used painters tape to attach the template we made for the Lego placement. I used an Exacto Knife to cut all the rectangles out so I can glue the Legos into place with the template attached. It worked out perfectly. Yeah! :)

If you'd like to download my template, it will be added to the bottom of this post.

Here you can see how I placed the Legos on their side into the template holes.

See, they went in perfectly. So easy.

Here is the backer board, all the Legos in place... gotta love that shiny finish too.

And this is the backer board mounted inside the newly painted black frame....

.... and loaded up with Bryce's favorite Lego minifigs. I have most of the supplies to assemble a second frame for Bryce's collection. I just have to get ahold of some more orange 2x2 Legos.

I just love how the Legos blend in to create the effect of the minifigs floating in the frame. Just perfect. 

Here is the Etsy store that inspired us to create our own minifig storage frame. 
This one is wonderful and all, but for $25.99 plus $12.00 shipping (for a total of $37.99), I knew I could do better. Our frame cost us only $13.50 to built... and ours store 42 minifigs while the Etsy one stores 28.

And last but not least, here is my template for the Lego placement on a 16"x20" backer board. It can easily be altered for a smaller frame too. 
To save the template, click on it to open it in full size, then just right click to save it. 

Just print the file onto multiple sheets and then assemble to become a full size template. The directions will print directly on the template.

Enjoy! Please feel free to link to this page to share your creations too. I'd love to see them. :)

Saturday, June 22, 2013

Jar Shaker Card and a Blogaversay Hop

Welcome to the 3 Year Celebration for
Georgiana at Carson's Creations. 
 If you've come from Lee-Ann's blog at Lee Scraps  you are in the right place! If you just came across the hop, please start at the beginning over at Carson's Creations.


 Okay, time for my project:
I created this Jar Shaker Card using Lawn Fawn's Summertime Charm stamp set and matching die cut set. I was totally inspired by Chari Moss of the Lawn Fawn Design Team to make this card and followed her basic directions but tweeked it to work for Georgiana's challenge of threes for her blogaversary.
See Chari's YouTube tutorial here.

My card measures 4 1/4"x 5 1/2" (standard A2) portrait style card. All the paper is from Creative Imaginations 6x6 "Brights" paper collection.
Simply Brights 6x6 in Scrapbooking Paper Pad 36 Sheets Creative Imaginations NEW
I used the blue swirl, the orange swirl and the green swirl (3 patterned papers). I inked all the edges with black memento ink.


The black cardstock layer measures 4" x 5 1/4", the blue swirl paper measures 3 3/4" x 5". Then I cut 1/2" pieces from the green and orange swirl paper and cut the banners at the ends. I then stamped the sentiments using a couple "Scrappy Mom's" stamps. I glued it across the card and then die-cut the jar shape out of the assembled card front.

I set the assembled and die-cut card front on top of the white card base and used the Summertime Charm stamps to stamp the jar directly on the base. Then, I stamped 3 lightening bugs and their matching "shine" stamp and colored in the bugs (adding stickles to the rear ends). I then cut a layer of craft foam to match the front, and then used the matching jar die-cut to create the layer of foam necessary to make this card into a shaker card. I stamped, colored and die-cut extra lightening bugs to "fly" around the inside of the shaker card with the micro beads I used. 

Before assembling the shaker card, I added the three black button brads to the card front. Then using score tape, I assembled the card in this order:
card base -- die-cut craft foam --add the micro beads and bugs -- attach a piece of transparency (or recycled clear plastic packaging) to the back of the card front -- attach the card front to the card base.

Lastly, I added three escaped lightening bugs to the top of the card. LOVE them! :)

Did you keep count?? Here are the "three"s in my project:
3 patterned papers, 3 sentiment banners, 3 sentiment stamps, 3 lightening bugs stamped in the jar, 3 lightening bugs loose in the jar, 3 buttons and 3 escaped lightening bugs. :)

Since this is 3 Years of blogging and crafting fun, we have LOTS of FABULOUS sponsors...

 stamp set
$15 gift certificate


dew drops

To qualify to win, you must:
1. Be a follower of Carson's Creations
2. Leave a comment on every stop of the hop
 
Winners will be announced at Carson's Creations on Thursday, June 27th.
 
Your next stop will be Pat at Pat Scraps
 
Here is the line-up: 
Thanks for joining us today for
Georgiana's 3 year  Blogaversary celebration!