Showing posts with label Robotz. Show all posts

Saturday, September 28, 2013

Lego Mini-fig Head and a Blog Hop

Hi, and welcome to the Cricut Crafts Blog Hop!!
 If you've come from Heather at Paper Junkie, you are in the right place! If you just came across the hop, please start at the beginning over at Jenny's Blog, Crazy About Cricut.

Okay, time for my project:


My son, Bryce, just celebrated his 11th birthday and his favorite thing right now is LEGOS!!! Do you have one of those kiddos too??

Anyway, I designed a Lego Mini-figurine head card for his birthday. While there is no Lego Cricut Cartridge, I had to come up with something....

Using my Gypsy, I combined some images from both Robotz and a couple periods and 1/2 of a parenthesis from Plantin School Book for the smiley mouth. I welded two of the Robotz image, flipping one upside down, to create a shape very close to the shape of a Lego Mini-Fig head.

I set the file up to cut the face (with the eyes and smile cut outs) on the left and the background face piece of the right. The card base was set-up on layer 2 on my Gypsy. I welded two of the background pieces together to form the folded base.

Here you can see all the parts ready for assembly. I sized the head to be 4 1/4" wide and just over 5 1/2" tall, you'll see why in just a couple steps.

So, I folded the base and I was ready for assembly. Like the Create a Critter carts, this card became very easy to assemble. :)

See, easy and quick assembly. :) Okay, so the bottom bump (called studs) on the Lego Mini-Fig head was a little long... so I used my paper trimmer to cut the card to 5 1/2" so it can fit in a standard A2 card. Don't forget to round the corners with a corner chomper or just by hand.

I added some details and doodling with my Sakura White Gel Pen.

Then, using the same face files, sized to 1", I made some Mini-fig confetti to put inside the card. Since Bryce was turning 11, his card was filled with 11 little friends. :)

If you'd like the Gypsy file for this cute little Mini-fig card, please let me know. I'd be happy to share.

Don't forget to comment on all six blogs of the hop for your chance to win one of these wonderful prizes:

$5 GIFT CERTIFICATE TO JADED BLOSSOM!

or 

5 PACK OF ACTION WOBBLES!

Your next stop will be Cindy at Cindy's Green Cricut!
 
Here is the line-up: 
Heather- paper-junkie
Cheryl - cardsbycg

Thanks for joining us today for

 the Cricut Crafts Blog Hop!!

post signature

Thursday, August 2, 2012

What we've been doing this summer!

Hi! Thanks for hoping with us along

If you came from Leah's blog (Leah's Card Designs), you are in the right place. 
If you just came across this hop and would like to start from the beginning, please go back to Jenny's blog (Crazy About Cricut).

So, my two boys and I have been doing TONS of yard work... including taking out an unneeded flower garden space and moving their playground with clubhouse. This is by no means a new playground, but it too fun not to include in our newly re-landscaped backyard!
Here is the playground. The last three years, we've planted a garden under the clubhouse. But, once we moved the structure (a huge job on it's own) we added 6 yards of cedar bark-chips and the boys decided the didn't want the garden in the new space. Now, they wanted a cafe to serve the neighborhood kids snacks and drinks. :)

So, here are the pieces we came up with....

First of all, we stained some scrap shelving wood and used vinyl to create all the signs we need. Using "Robotz", we created the letters. The sizes range from 1"-3" tall. The little bottle and drink cup on "The Bros. Cafe" is from Everyday Paper Dolls (cut to 3" RDS). The "Open, come on in" sign is double sided. :)

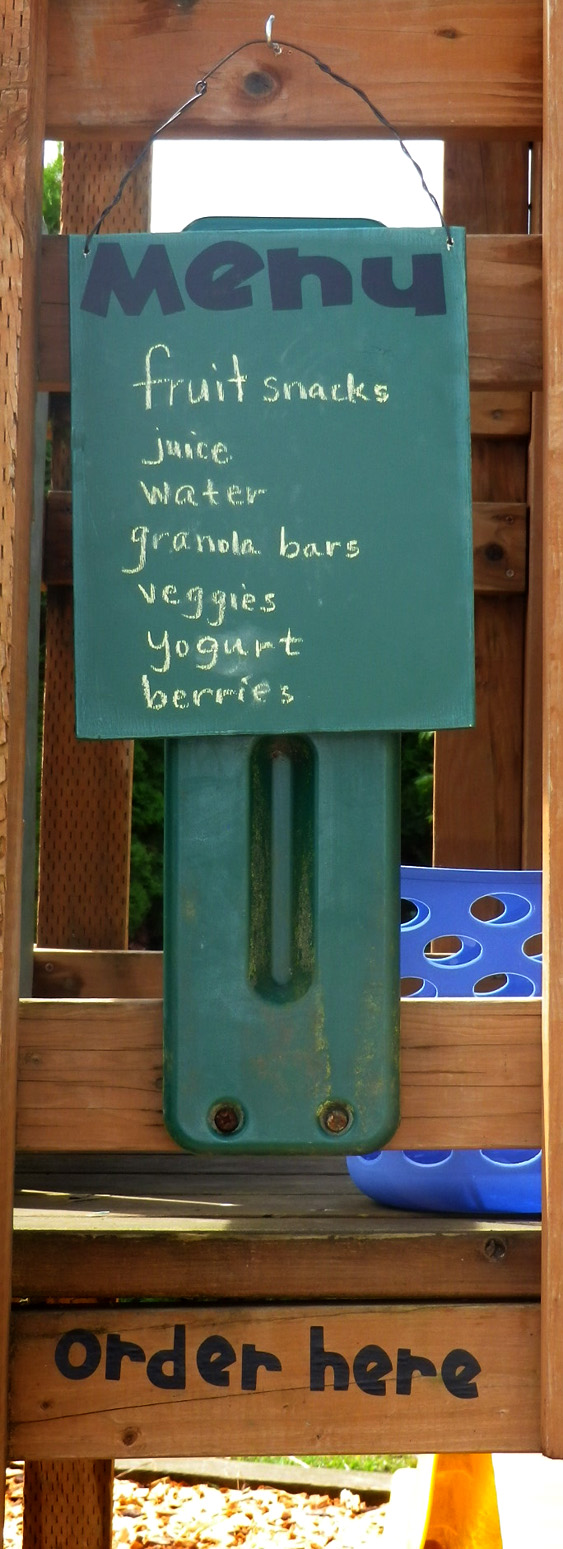
We made an "order here" and "pick up here" signs as well as a menu board... complete with chalkboard paint so the boys can change the menu items as the snack change. 

Here is the pick up window.... the idea is that the neighborhood kids can order at the front window (the side of the playground closest to the front yard), then they can climb into the clubhouse, play with the pullies, chalkboard etc and then slide down when their order is up. That takes them to the backside where the pick-up window is.

Here are the snacks of the day... we have strawberries, cherries, Capri Suns, water, fruit snacks, granola bars etc.

This is my son, Bryce, under the clubhouse. He's eagerly awaiting a customer. As you can see, we also built a bench under here where my boys can enjoy their own lunches and escape the heat a little.

And if we are away from the cafe, here is the "Closed, see ya soon" sign. All the signs were stained, then the vinyl letters were added, then all of them were sealed with a clear coat of spray sealer.

You can almost see the pride on my son's faces!! They are having a great time with their little cafe! My mother-in-law actually made them their own little aprons to wear while they are out playing!! :) We added some flocked iron-on letters to spell out their names... they just LOVE them!!


Thanks for visiting me today. 
Before you jump to the next stop, please leave a comment
(and don't forget your contact info) 
to be entered in my drawing for some blog candy...
a $20.00 gift card to either
Michael's or Joanns -- winner's choice!!!
Drawing will take place on Monday, August 13th, 2012.
FYI: I don't post winners to my blog, I email the winner(s) directly.


Your next stop in the blog hop is:
Amber @ My 3 E Scrapbooking

Tuesday, June 12, 2012

Father's Day Pocket Cards

Today marks the start of another Die Cuttin' Divas Challenge!!
This week the theme is

My two sons and I chose to make some Father's Day cards!
  Here are the cards by  seven and nine year old sons made with me today:

We made these pocket BBQ cards. I'll be including a full tutorial, so please forgive me for the tons of pictures on this post. So, here we go...

You'll need the following cuts from From my Kitchen:
BBQ and it's shadow - 4" - red / black
Spatula - 2" - metallic silver
Handle from the hand mixer - 1" - metallic silver
oval sized to 1" x 4" (for under the grill top) in silver

Cuts from Robotz:
half circle (red lid for BBQ) - 4" W x 2" H - red
half circle (black for lid shadow) - 4 1/4" W x 2 1/4" H - black

Extras:
Background paper cut to 4" x 5 1/4"
card base 4 1/4" x 5 1/2"
4 1/4" x 3" piece of cardstock for the insert.

First, attach the silver oval under the grill top. We used Scotch Quick Dry Glue.

Glue all the shadows to their pieces.  My kids do pretty good lining up the pieces, but younger kids might need some more help. The glue the BBQ to the card base after attaching the background paper.

THIS IS A PARENT ONLY STEP:
Open up the card base and put it on a self healing mat. Use an Exacto or similar knife to cut open the BBQ at the base of the grill top (see photo for help). Cut all the way through the card front.  

Glue the card base together to make a pocket.  I marked the inside of my card to show you where we put the tape runner (we use my ATG gun). Glue the four sides of the card front along with a couple more strips of glue along the top of the card above the cut only (see picture).

My nine year old added all the "Happy Father's Day" stamps. This one is from Studio G. My seven year old added the silver metallic spatula with some more quick dry glue.

Slip your insert into the pocket as far as it can go.  Add some pop-dots along the top of the insert. 

Place the lid onto the pop dots. Try to line up the lines of the BBQ and completely cover the grill top. My kids both love this step! :)

See how the BBQ lid pulls the insert?? Love it! :)  

We added just a little scrap slip of the bg paper to the bottom of the insert. It looks cute and there is no waste. We made six of these cards and needed one sheet of the 12x12 DCWV paper (called Juniper stars on Cream), two sheets of red card stock, two sheets of black and only scraps of the silver and metallic silver paper. For our card bases we used pre-made white cards, but it would only take three sheets of white card stock if you are making your own card bases.


We'd love for you to come on over and play along with us at Die Cuttin' Divas!
The theme this week is 

The sponsor for the Challenge prize is

Saturday, April 21, 2012

Mother's Day Project : Recycle your Easter Basket

I am in two blog hops this weekend, please come back Sunday for the
Recycle, Reuse and Re-purpose blog hop.

Thanks for joining us today for the
Mom's Day Blog Hop!!

If you've come from Nicolette at Beyond Scrappin', you're in the right place.  If not, please jump back to Nicolette's blog to start at the beginning... you don't want to miss a stop!

Today, I have a project that re-purposes an Easter basket while preparing a wonderful gift for Mother's Day!!
Here is my completed project. I just love how fresh and new that basket looks!

Here is the basket I started off with. There's nothing wrong with it... it's just plain.

So I drilled some drainage holes in the bottom, used painter's tape to mask the top and bottom rims as well and the handle and went to work with some light blue spray paint...

MUCH better... don't you think?

Next, I added some airy soil and planted a nursery-bought plant inside. 

Next, I added a yellow wired ribbon to one handle and a cute little card on a flower pick.

Here is the adorable card and the second bow.

This little card measures a minuscule 2" tall and 3 1/2" wide. The letters are from Robots and I used my Gypsy to weld the letters together. I added this little card to the flowers with a flower pick and the gift is ready to go. I think the basket is a lovely gift.


Thanks for visiting me today. 
Before you jump to the next stop, please leave a comment
(and don't forget your contact info) 
to be entered in my drawing for some blog candy...
a $20.00 gift card to either
Michael's or Joanns -- winner's choice!!!
Drawing will take place on Monday, April 30th, 2012.


I'm in two blog-hops this weekend and one next week and I'll leave the giveaway open for all three and will give a total of three gift cards away!!


Your next stop in the blog hop is:

Sunday, May 29, 2011

Robot Doggie Card

We had a very nice BBQ with my hubby's family yesterday... so today my kids need to recuperate from all the excitement.  It did give me a perfect time to cut this card that had been sitting in my Gypsy for a few days.

I used DCWV's The Guy Stack for all the paper with the exception of the cogs and the gear on the bottom. The card shape and all cuts are from the Robotz Cartridge. I cut the card layer at 4 1/4" x 5 1/2" and welded two shapes together. I made the mats by coping the shape and resizing then by 1/4" for each layer.

The "happy birthday" sentiment is from Hero Arts set called Big Hugs. I added some long gel pen stitches using my white Gelly Roll pen.

Here is the robot doggie. He is cut at 3 1/2" (and all layers).  How cute is that paper... his face has a blue glossy diamond plate pattern! I added some Black Diamond Stickles for the accents.

I think he would have been ADORABLE on a wobble, but I just mounted him up on some tall pop dots.

Here are the gear and cogs. I used DCWV metallic silver paper for the top layer and generic gray card stock for the shadow layer.  There wasn't any cut like this on the cartridge, so I made this border by lining up the 1/2" shapes and welding them together to make a border. I then resized them a little to make the shadow layer. I added little silver brads to the center before I glued them down to the base layer.

Challenges: 
post signature