Showing posts with label everyday paper dolls. Show all posts

Thursday, August 2, 2012

What we've been doing this summer!

Hi! Thanks for hoping with us along

If you came from Leah's blog (Leah's Card Designs), you are in the right place. 
If you just came across this hop and would like to start from the beginning, please go back to Jenny's blog (Crazy About Cricut).

So, my two boys and I have been doing TONS of yard work... including taking out an unneeded flower garden space and moving their playground with clubhouse. This is by no means a new playground, but it too fun not to include in our newly re-landscaped backyard!
Here is the playground. The last three years, we've planted a garden under the clubhouse. But, once we moved the structure (a huge job on it's own) we added 6 yards of cedar bark-chips and the boys decided the didn't want the garden in the new space. Now, they wanted a cafe to serve the neighborhood kids snacks and drinks. :)

So, here are the pieces we came up with....

First of all, we stained some scrap shelving wood and used vinyl to create all the signs we need. Using "Robotz", we created the letters. The sizes range from 1"-3" tall. The little bottle and drink cup on "The Bros. Cafe" is from Everyday Paper Dolls (cut to 3" RDS). The "Open, come on in" sign is double sided. :)
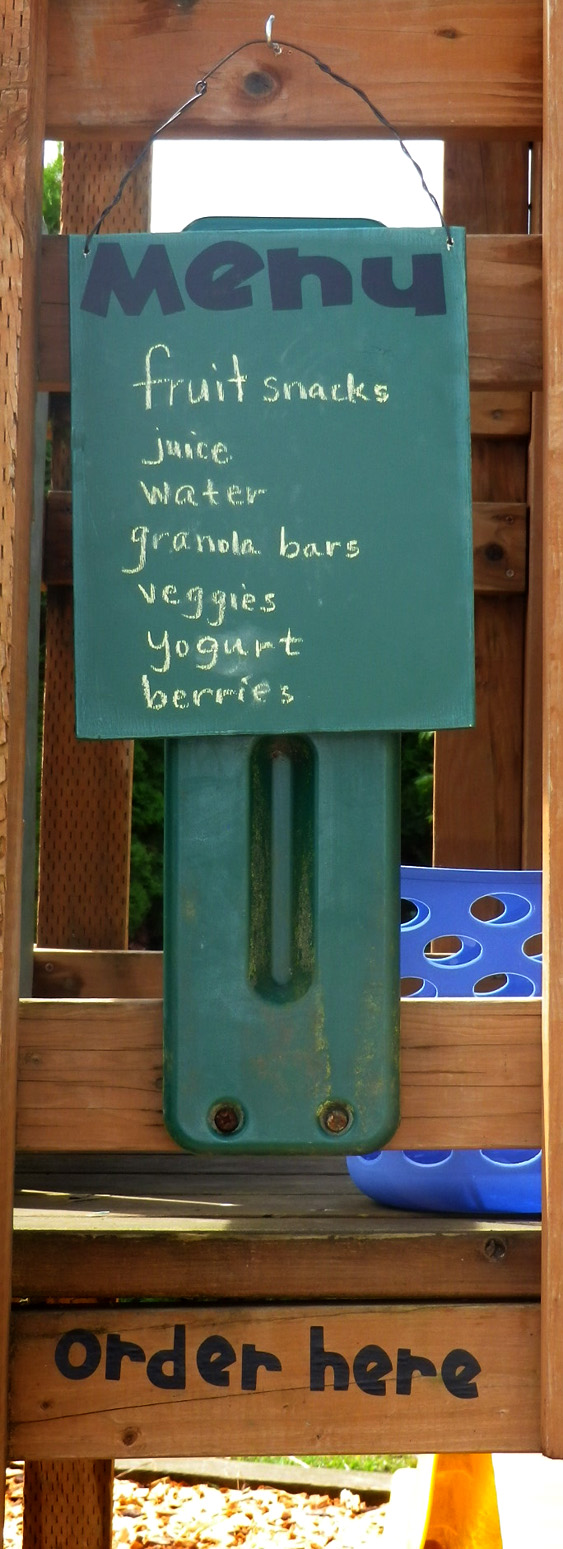
We made an "order here" and "pick up here" signs as well as a menu board... complete with chalkboard paint so the boys can change the menu items as the snack change. 

Here is the pick up window.... the idea is that the neighborhood kids can order at the front window (the side of the playground closest to the front yard), then they can climb into the clubhouse, play with the pullies, chalkboard etc and then slide down when their order is up. That takes them to the backside where the pick-up window is.

Here are the snacks of the day... we have strawberries, cherries, Capri Suns, water, fruit snacks, granola bars etc.

This is my son, Bryce, under the clubhouse. He's eagerly awaiting a customer. As you can see, we also built a bench under here where my boys can enjoy their own lunches and escape the heat a little.

And if we are away from the cafe, here is the "Closed, see ya soon" sign. All the signs were stained, then the vinyl letters were added, then all of them were sealed with a clear coat of spray sealer.

You can almost see the pride on my son's faces!! They are having a great time with their little cafe! My mother-in-law actually made them their own little aprons to wear while they are out playing!! :) We added some flocked iron-on letters to spell out their names... they just LOVE them!!


Thanks for visiting me today. 
Before you jump to the next stop, please leave a comment
(and don't forget your contact info) 
to be entered in my drawing for some blog candy...
a $20.00 gift card to either
Michael's or Joanns -- winner's choice!!!
Drawing will take place on Monday, August 13th, 2012.
FYI: I don't post winners to my blog, I email the winner(s) directly.


Your next stop in the blog hop is:
Amber @ My 3 E Scrapbooking

Tuesday, April 17, 2012

Garden Birthday card

Today marks the start of another challenge over at Die Cuttin' Divas.
This week the challenge is:
Garden theme

Today, my card features a 3" wheelbarrow from Walk in my Garden, clouds from Serenade, grass from Everyday Paper Dolls and the sun from Celebrate the Occasion! The card base, sun and sentiment banner are all made from handmade wildflower embedded seed paper!! All those layers can be planted to grow a wonderful garden of wildflowers!

I inked all the layers with a sponge and coordinating ink colors. I hand cut the little banner and stamped it with a Scrappy Mom's Stamp. I used Momento black ink... if you are stamping on textured paper like this, it's a great idea to test the ink on a scrap of the paper before you put it on your project.

The center of the little flowers are finished off with some Liquid Pearls in light yellow.

All the layers and embellishments are added with pop dots. I wanted to make sure they can be easily removed so the card base can be planted.

We'd love for you to stop by Die Cuttin' Divas and enter the color challenge!
Garden theme

The sponsor this week is The Greeting Farm

Tuesday, August 16, 2011

Tire Swing Tent Card

 My good friend Georgiana is a very proud member of the Die Cuttin' Divas design team and she asked me to be a guest designer for today's "kid challenge."
This tent fold card measures 4 1/4" x 5 1/2". The adorable card front cut out measures 4" (from Preserves).  The card front layer is a wood grain paper from DCWV's Green Stack.

The terrific branch is from Serenade and I sized it (and the leaves) to 4 1/4" wide so it will extend beyond the card mat. The leaves are inked with green ink and attached to pop dots. I strung the tire swing to the branch with some craft string... it needed something else, so I also tied some in a bow and hot glued it to the top.

I added gel pen doodling all over this card... no rhyme or reason, I just added them where I thought they'd look good.  The button is adorable, I tied some more of the craft string to the center to match the rope for the tire swing.

The tire is made up of a series of circle from Plantin Schoolbook.  The black tire measures 2 1/2" and 2 1/8" and the white wall line measures 2" and 1 5/8". The adorable little boy (from Everyday Paper Dolls) is 3 1/2".

I finished off the back of the little boy too, I cut two of all his clothes so that if the tire swing got turned around, it would still look good. I cut the little boy in half (he didn't feel a thing) so I could attach him as though he is sitting on the tire. I used some scrap cloud paper to finish up the inside of the card.

Here you can see how the card stands on it's own.  The way the card is folded, it will flatten out to fit into a standard A2 envelope.  I'm not sure where you'd write on this card, but it was too cute not to make it!! Once I had the idea of this card, I just HAD to make it! :)

Please head over to Die Cuttin' Diva's and enter the "kid challenge."

Challenge:
(everything except the card base is from my scrap bin)
Craft Junkie Too Friend

Monday, August 8, 2011

Sailboat card

The new challenge over at Paper Playtime is to "Cool off with Water!" I think it would be a lovely way to enjoy the summer weather by sailing into the sunset.  Here is my take on the challenge. The card shape is from Preserves.  I sized it to be an A2 portrait card.  I just love the shape! :)

This adorable little sailboat is from New Arrival. It's sized to 3 1/2".  All the pieces are cut from scraps. I added some Glossy Accents to the little port-hole windows and attached the boat with pop dots. I added an adorable little red button to the top of the mast.

The clouds are from Everyday Paper Dolls. I sized them at 2", 1 3/4", and two at 1 1/2". I used a finger dauber to ink them in royal blue and "trace" them with some Star Dust Stickles.  I did the same thing to the patterned paper for the sky.

The sun is from Country Life (cut at 2 3/4") and finished off with some dark orange ink (applied with a finger dauber) and Glossy Accents.  The wave are from ZooBalloo (the taller waves) cut at 3/4" and Plantin School Book cut at 1 3/4" and 1 1/4". I inked all those with royal blue ink too.  After layering them on the card front, I applied Stickles too.

The little rhinestones are from Craft Warehouse, the "hello" stamp is from Scrappy Mom's. As a finishing touch, I doodled some stitches using my white gel pen.

post signature

Wednesday, August 3, 2011

Yellow Submarine card

Are you a fan of the Beatles?? I created this card today and all I could think of was the Beatles song "Yellow Submarine."  So the song wouldn't be stuck in my head for days, I created the inside sentiment using lyrics from the song.

I love the submarine from "Life's a Beach" .... unfortunately, I don't have that cart. :(  So I used the LAB sub as a guide to make my own... using Boys Will Be Boys. The rear propeller is the propeller from the helicopter (cut at 2").  The body of the sub is a football (cut at 4" W x 1.89") the striped yellow body is from the squirt gun (cut at 4").  The scope part of the submarine is put together using a hammer head (periscope) at 1 1/4" , the letter "I" cut at 2.44" T x .94" W and a rounded square sized to 1 1/4".  The little port holes were the easiest part, they're just circles sized to 1/2".

I inked the pieces using orange and black ink to give them a shaded look.  I almost always add some doodling for character. I covered the port holes with Glossy Accents.

The waves were cut using Heidi Grace paper scraps.  
The measurements were:
the tallest wave (from ZooBallo) was cut at 2" x 5 1/2"
the middle wave (from Everyday Paper Dolls) cut at 1 1/4" x 5 1/2"
the smallest wave (from ZooBallo) cut at 1" x 5 1/2"
I inked all the waves (and the sky) with royal blue ink and a finger dauber.  Once assembled, I traced the waves and card layer with Stardust Stickles.

I added a few of these cute dark blue self-adhesive rhinestones to add some more sparkle. I love to add embellishments like these in threes.

Here is the inside sentiment. I printed it onto white card stock using  Pea Shelia font at 14 points.  

Challenges:

Thursday, July 28, 2011

Hoppy Birthday Card

Today I made this adorable rabbit card.  I love the shape of the card, but it's all the little details that make this card even more special.
The bunny and all his layers are from Nate's ABCs. I sized them to 4" but I added a second layer of grass (from EDPD) to give it some more height.  The little bunny doesn't come with any details, so I found shapes on Nate's ABCs that I could use for his nose and ears.  The little cotton tail is Q-tip cotton I attached with a little hot glue. The card shape is from Preserves, it's actually a tag I sized to fit an A2 envelope. 

The senitment is from My Pink Stamper's Punny-licious.  I inked all the grass layers with green ink and a finger dauber.  I attached the bunny with pop-dots and the grass with thicker pop dots.

The eye and these black pearls are self-stick flat back peals I grabbed from Craft Warehouse.  Here you can see I also inked around the background paper.  Using black ink and a finger dauber gives the wood grain paper a wonderful distress look.  The background paper is from DCWV's Green Stack.  I used a mat stack, but I also have it in an 8" x 8" stack.

Like most scene-style cards, I like to make the card open from the top so it can be displayed.  For this card, I couldn't make the card open from the top and preserve the tag top shape. My card base measures 5 1/2" x 7 3/4" and folds in the center.

Challenges :  
post signature

Wednesday, May 11, 2011

KinderGARDEN - End of the year gift

Tracy over at Craft Junkie Too is up to it again!! She has asked her wonderful design team (including me) to create a project with the theme:
End of School - Teacher Gifts

Here is the gift I am presenting to my 6 year-old's kindergarten teacher. One of the other Mom's in my son's class traced all the student's hand for me. I then made these boards to showcase their adorable hand prints. I painted two 2' x 4" thin birch panels.  I added some Cricut cut grass layers, and made each of the students into a flower (the stems are from Walk in My Garden) and the name of the student is also a leaf on the stem. Each flower has a Peachy Keen face too. Then I added clouds and garden tools to finish off the board.

The clouds say "Teachers plant the seeds of knowledge..." and the second one says "and look how much we've grown."  The kingerGARDEN tools include a watering can that says "practice" and seed packet that says "learning skills" and the sun that says "patience and encouragement.  I added doodles all over the flowers and all the little tools too. 

Here is a close-up of the watering can and seed packet (or garden marker). I inked all the edges on both of these items and secured them with Scrap-dots. Scrap-dots are a 3-D liquid adhesive that comes in a tube like ointment. Love it, but it takes a little time to dry.

Here is the sun, again I inked the edges and added doodling.

Here is my son's hand.  I think the Peachy Keen faces add a lot of character! :)
  
How cute are all those little flowers! Yep, the huge flower on the right belongs to Mr. Smith, the Kindergarten teacher!!

Here is the class presenting the gift to their teacher.  Don't they all look so happy!
Each student was very excited to see their name and hand print included in the gift! 

 Jump over to Tracy's blog at CraftJunkietoo.com and 

see what she and her other Crafty Designers have to share.
Amber and Tracy have both made wonderful projects to show you today!
We'll also have some wonderful new designers joining us TODAY, so go check them out too.

post signature

Friday, April 29, 2011

Tall Basketball Card

If you haven't yet, please take a second to enter my 400 follower giveaway!
The giveaway ends tonight at Midnight, so be sure to enter now! :)

I made this card for my hubby's birthday. He's a HUGE basketball fan (particularly the Portland Trail Blazers... and they're in the playoffs right now), so this card will be perfect for him.


The card base measures 9" x 4" and fits a standard business sized envelope. The basketball and hoop are from Everyday Paper Dolls (and I created a shadow for them too).  The "Happy Birthday" is from Create a Critter. I usually love CAC, but I am not in love with this sentiment on this card. :(

I inked the little cuts the cricut cuts in the basketball, I then ran it through the Swiss Dots cuttlebug folder and inked the ball with some orange ink and a finger dauber. The basketball is attached to the card with an Action Wobble. 

Here is the basketball hoop.  I cut it in white and metallic silver paper and cut the rim off the silver one to attach to the net.  I threw on some little black details to the net too. This is attached to the card with some thick pop dots.

I rounded the right corners of the card with my 1/2" corner rounder. As always, I used my white gel pen to add some doodling... dots and dashes this time. Here you can see the orange and white twine I accented the card with.

This inside pocket is a perfect place to write your message on but it's also a wonderful place to stash some lotto tickets or tickets to see a basketball game! :)  The orange background paper is from DCWV's summer stack and the craft card stock and black card stock is generic supply from Joann's.

I am adding this card to the challenge over at More Than Favors:

UPDATE: 
I had issues with the CAC sentiment I cut for this card. It fit perfectly with the challenge I was entering, but I didn't love it.  Here is what I came up with that I like much better.

I used scraps of the paper I already used on this card, but added a Scrappy Mom's Stamped sentiment. I attached it with pop dots too.  


post signature