Showing posts with label More Than Favors. Show all posts

Thursday, August 11, 2011

Thinking of you popsicles

I was looking around at my favorite blogs today and was totally inspired by Cassandra at Cricut Croppin' With Cassandra. She didn't share dimensions or anything, so flying by the seat of my pants, I created this card.
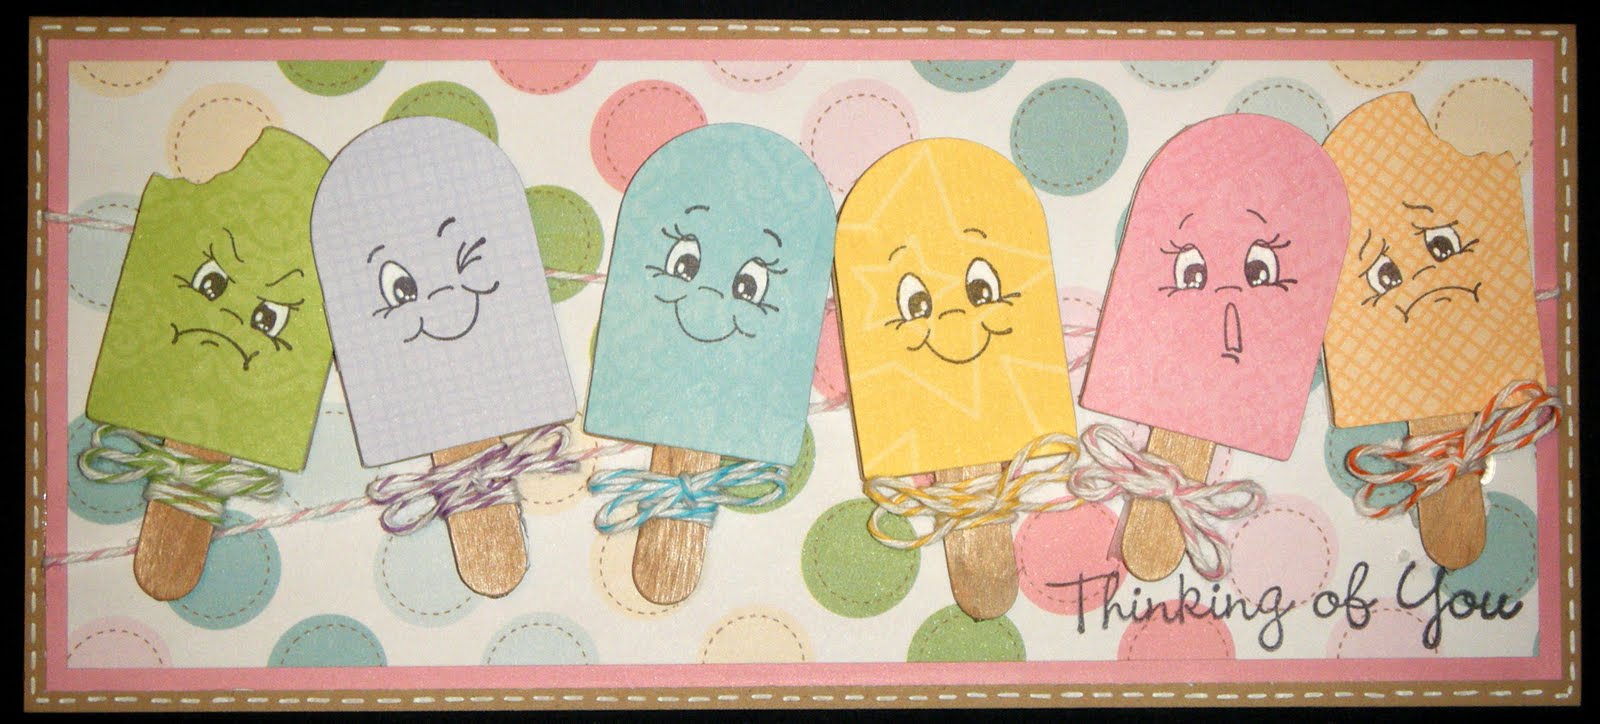
This is a 4" x 9" card (standard business size).  I cut the little popsicles using Simply Charmed (2 1/2") but added real popsicle sticks to the bottoms!! CUTE right?!? Love it. 

I cut the popsicles in six different colors and added a different Peachy Keen face to each one. These faces are 1" from Everyday Character Assortment, but I'd think that different sizes may work fine too, depending on the set you are working with.

I tied matching bakers twine to each popsicle, I tied a double loop bow too. Coloring the whites of the eyes with my gelly roll pen adds a lot of character.  Some popsicles are mounted up on pop dots, while other are attached directly to the card base.

The ones with a bite out have a sad or mad face.  The "Thinking of You" stamp is from a TPC Studio set. I also added a couple of loops of pink and white bakers twine around the pink and polka-dot layers before I adhered it to the craft colored base.

I hope you can see the dimension in this picture.  Because of the popsicle stick, each of the popsicles is put together with pop dots, then some are added to the base with pop dots... love the height and dimension on this card!! Like usual, I added a line of gel pen stitches to the card base, inside and outside.

Here is the inside... I attached the scraps from the card front to the left hand side.  I only glued down the top, bottom and left hand side of these layers, that way you could add a gift card or something if you'd like.

Challenges:
Craft Junkie Too Friend

Friday, July 22, 2011

Tall Gate Fold Card

Here is a "just because" card I made for my hubby today... best of all... it's all scraps!!! :)
The paper is from the DCWV "Guy Stack". The card measures 9" x 4" (card base is 9" x 8" scored at 2" on each end of the 8" side).  I attached some brown ribbon 3" up on each end of the mustache panel. Then I centered the blocks between the sections.  I used ATG tape to glue the top and bottom block on the left side of the gate fold and the middle panel is glued to the right side, creating a latch to keep the card closed.

This is cut from the sentiment block page in the "Guy Stack" paper pack. I measures roughly 2" x 2" (including the mats). My hubby wear a goatee so it's perfect for him! :)

This is a journalling tag from the same sheet of paper. I wrapped some brown and white twine around the block before attaching it to the card base.  I used a chipboard weight "thicker" letter for the "r".  I attached it with pop dots.

Here is the bottom block on the card.  The mustache is glossy.

Here is the card opened up.  I added some coordinating paper to the inside of the card. You can see the way the blocks attach to the panel. The "you're #1" stamp is from a Studio G set.

post signature

Wednesday, July 13, 2011

Camping Kiddos card

Hi guys! I have a cute card to share with you today.  This is a #10, business sized card.  I love this larger ( 4" x 9") card format and the envelopes are super easy to find... no extra postage either!
The camping kiddos are from Nate's ABCs sized to 4".  I cut all layers as seen in the booklet, but added an extra layer to the top of the cut... I cut the tent flap from vellum and folded it over the top edge.  It can be lifted to see all the layers.

I cut the boy's shirt sleeve and the doggy's collar in yellow to give it some more color. The dog layer is added with pop dots. I laced some white crafting twine around the card before attaching the patterned paper mats to the card base.

This sentiment stamp is from Scrappy Moms.  I added it to a little punched tag shape. Three black dew drops (flat back stones) sure add a lot to the details of this card.  NO GEL PEN STITCHES HERE!!! I know... WOW! :)

I inked the edges of the brown polka dot paper (from DCWV's Guy Stack) before adding it to the mat layers. The grass is inked in green and the vellum tent layer is inked in black also. The entire die cut piece is attached with pop dots and gives the card such wonderful dimension. 

The inside of the card got some scraps to finish it off.

post signature

Sunday, July 3, 2011

"Feel Better!" Star card

The card I am sharing today was made for a very special little boy. Over at Whimsical Wednesday, the challenge this week is to make a card for a 15-month-old named Angelo and his family. Angelo recently had surgery to remove a brain tumor and will be starting chemotherapy very soon.
The blue and red stars paper is from DCWV's All About Boys set. I matted it with black and then layered it onto a white card stock base after I rounded all the corners with my Corner Chomper.

The three layers of the star are from Simply Charmed (cut at 3", 3 1/4" and 3 1/2"). My six year old said this little star needed a band-aid so he added that.  I punched out little "kissy lips" and glued that to the band-aid and added some Stickles. I added some white gel pen stitches and attached the star with an Action Wobble. This face is from Peachy Keen Stamps in their "Everyday Face Assortment" but it's the largest face in the set.

The "Feel Better!" stamp is from Scrappy Moms Stamps : Simple Sentiments.  I added some light blue 1/8" satin ribbon to the card layer before attaching it to the card base. The black card layer also got some gel pen doodling.

On the inside of the card is another Scrappy Moms Stamp from the Everyday Greetings. I used some scraps from the front card layers to finish off the inside of the card.

If you have the time to enter any challenges, please fit this into your schedule.  Visit Whimsical Wednesday and find out more about little Angelo and his special get well wishes card drive.

Challenges : 
post signature

Thursday, June 23, 2011

Baseball Birthday Tag

I have this fun tag to share with you today.  I made it with a special little boy in mind. His birthday is coming up in July and he just loves his baseball! 
The tag measures 3 1/2" x 3 1/2".  All the cuts are from Boys will be Boys, cut at 2 1/2". I cut the background layer from some scrap of some DCWV glitter paper (from Nana's Kids I think). The card base and the bat are both scrap Bazzill card stock, they both have a wonderful linen texture. When I inked the bat with the brown ink, the texture sure stands out nicely.

I hand cut this little pennant and added a Studio G stamp. I added little red tails to the pennant to help the red stitching in the baseball stand out.

Here is the baseball.  It cuts in two layers, thankfully the white is the top layer and the red is the bottom layer... I'd hate to have to piece those little stitches. Like usual, I added some white gel pen doodling to the shadow layer. Here you can see some of the twine. I wrapped it around the blue glitter patterned paper before I popped the whole layer up on pop-dots.  Then, when I applied the bat and ball, they each got a layer of pop dots too.

I had just a little left over of the patterned paper, so I added it to the inside of the card.  I used my We Are Memory Keepers 1/2" Corner Chomper to this layer and the card base too. Here you can also see the little rectangle punch I used so I'd have a place to string this tag to the gift.

Challenges:
post signature

Friday, June 17, 2011

Wedding card

Today I have a couple of wedding cards to share.  I think they are so fun!
Here is how the card looks closed.  It is a standard A2 size (4 1/4" x 5 1/2") when folded. The tux is from Wedding Solutions cart and the wedding dress is a mix of two dresses from Tie the Knot. Both measure 4 1/4" tall.  I welded them to the card base to they can each fold out to revel the second layer of the card.

Here I added some wonderful Heidi Grace paper. It has a black background with some medium gray swirls (that doesn't come out in the picture). I cut the little 1" bells from the Wedding Solutions cart. The "Congratulations!" is from Scrappy Mom's Stamps and it's embossed in white. I love how they are both hidden by the front layer.

Here is the last layer of the card. The black card layer opens up to reveal the sentiment "Wishing you the best, today and always. Congratulations!" in Edwardian Script.

Here is the dress up close. I cut it out of white shimmer card stock.  After embossing it with the Swiss Dots embossing folder, I attached it with quick dry glue and added some liquid pearls and clear Glaze pen accents around the edge of the dress.

The tux also got some clear Glaze pen accents, but I also popped up the lapel and bow tie up on pop-dots.  The shirt layer is cut with some more white shimmer paper. The little buttons on the tux are added with more liquid pearls.

I made a second card that is just slightly different.  On this one, the bride and groom are reversed, so is the "Congratulations!" on the second layer.

Again, I embossed the Scrappy Mom's stamp and added the little bells.

Here is the complete look at the final layer of the card. The card base it cut in Ivory, but it sure looks yellow in this picture. Sorry, today was the last day of school for my kids and I couldn't start crafting until they went to bed.... ie no good lighting for my pictures! :)

Challenges:
post signature

Friday, June 3, 2011

Whale Father's Day Card

I love Create a Critter but haven't used it in a while. Today I had to pull it out and whip of this adorable card... at least I think it's adorable! :) 

I've been on a roll with the tall/long cards.  The card bodies measure 9" x 8" scored in half to a card measuring 9" x 4" and fit perfectly in a business size envelope.  What's great about that?? These envelopes are super cheep and easy to find... plus they don't require ANY extra postage!! 

The papa whale is cut at 3 1/2", the larger son whale is 2 3/4" and the smaller son whale is 2 1/2". They were all cut using scraps, so I can't remember for sure which paper came from where.

The large waves in the background are from Plantin Schoolbook and PDDU, both sized to 9" wide.  I added a little strip of craft paper for the sand.  I inked all layers with royal blue ink, except for the sand layer which got brown ink.

I love the little details all the whales got.  Each are decorated with two flat back pearls for eyes and white gel pen accents. All the blow spouts were finished off with Glossy Accents.

I made the little "Happy Father's Day Dad!" banner using Photoshop and 24 point Freestyle Script. I just used a square punch to cut the little points on the ends of the banner. Again I matted it with blue paper and inked it with royal blue ink.

I finished the black card layer with white gel pen stitches and added three more flat black pearls to the top left of the card base. I think the card turned out adorable.  I hope you like it too!! :)

Challenges:
post signature

Tuesday, May 31, 2011

Baby Brother Card

I just found out my cousin is welcoming his second little boy to this world in a few days.  I think it's wonderful, the age difference between his two boys will be very close to the gap in my boys! :) This card really reminds me of those times when my boys were little!

Here is the card I made for my cousin and his wife:
The card base is 4 1/2" x 5".  I grabbed the lace-up card base from New Arrival and hid three sides on my Gypsy to get the blue polka-dot base that laces on only one long side. I laced it with a sheer white ribbon and 1/8" satin blue ribbon after I tied the bow with my Bow Easy. The oval is also on the New Arrival cart.

I love these little feet from New Arrival, I cut them at 1" in generic white cardstock.  I inked the edges and popped them up on some pop-dots. I covered them in some Studio G glitter glue for a little sparkle.  I also added the glitter glue to the oval frame around the pencil drawing of the boys.

Here is a close-up of the bow. I placed a simple square button on the top.

I created this cute little banner for my sentiment.  The stamp is from Scrappy Moms. Again, I inked the edges with some blue ink and a finger tip sponge dauber.

I inked the inside too and added two more little (adorable) feet! :)

I adore the image I used.  I drew this back when my youngest was a newborn. I don't draw often anymore but I used to when I was in college.  This one took me some time! I was using a photo as my reference, the picture was taken when my now six-year-old was 4 days old. :)
I scanned this image and printed it on glossy photo paper for this card.

Cartridges used:
New Arrival

Supplies:
Studio G Glitter Glue
Blue ink and finger dauber
Scotch Quick Dry Glue
3M ATG glue runner
blue polka-dot paper is DCWV - Nana's Kids Stack
Blue gingham, Making Memories
sheer white ribbon - Dollar Tree
Blue satin ribbon - Michaels
Blue button - Michaels

Challenges:
Linking Party at : Passionately Artistic

Craft Junkie Too Friend


post signature